Monday, April 28, 2008

Apple Rum Raisin Bread

Rum Raisin Apple Bread

Rum Raisin Apple Bread

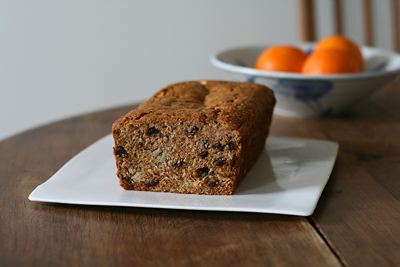
I own all of Sara Foster's cookbooks. I like that they have a variety of simple, fresh-tasting recipes. I made this Apple Rum Raisin Bread to go along with sunday's brunch. The original recipe is doubled, and calls for a combination of raisins and currants.

This isn't my favorite quick bread yesterday, but it was an interesting change. I like rum in baking, and the homey flavor of cinnamon, cardamom, and apples. I think this loaf is best on the second day; it's a little difficult to slice neatly when it's fresh from the oven.

Apple Rum Raisin Bread
adapted from Sara Foster's The Foster's Market Cookbook
makes one 9x5 inch loaf

2 cups all-purpose flour
1/2 tbsp baking powder
1 tsp baking soda
1 tsp ground cinnmon
1/2 tsp ground cardamom
1/4 tsp salt
1 cup sugar
2 large eggs
1/2 cup + 2 tbsp canola or safflower oil
6 tbsp dark rum
1/2 tbsp pure vanilla extract
2 granny smith or other tart aples, peeled, cored, and roughly chopped
1 cup raisins

1. Preheat the oven to 350F
2. Grease and lightly flour one 9x5 inch loaf pan and set aside.
3. Sift together the flour, baking powder, baking soda, cinnamon, cardamom, and salt in a large bowl and stir to mix.
4. Cream together the sugar, eggs, oil, rum, and vanilla in a separate bowl with an electric mixer.
5. Add the flour mixture to the egg mixture and stir just until the dry ingredients are moist and blended. Do not overmix.
6. Put the apples in the bowl of a food processor fitted with the metal blade and pulse several times; you should have about 2 cups processed apples. Add the apples and raisins to the batter and mix until just blended. Pour the batter evenly into the prepared pan.
7. Bake 1-1 1/4 hours, until the bread has risen, the top is slightly cracked, and a toothpick inserted in the center comes out clean (note: this is a very dense, moist loaf.)
8. Let rest for 10-15 minutes before removing from the pan. Serve warm or place on a baking tray to cool.

Sunday, April 27, 2008

Vegetarian Sweet Potato Hash

Vegetarian Sweet Potato Hash

Vegetarian Sweet Potato Hash

Dan hosted a brunch in Bloomfield this morning. Since he was making french toast, I decided to bring something savory. I decided to use a Sara Foster hash recipe and make it vegetarian friendly. I have posted the original recipe below, but I will warn you that I barely followed it.

I woke up early and prepped the ingredients with an unfortunately dull chef's knife. I was doubling the recipe and noticed that my skillet was way too small, so I decided to cook the components separately.

I cooked the onions and peppers and transferred them to a large roasting pan. I should have added more oil; there wasn't enough when I added the veggie sausage and it sortof crusted on the bottom of the pan. Everything was overheated and scorching.

Dismayed, I switched skillets and left that one to soak. I cooked the potatoes, which didn't brown nearly as nicely on the non-stick surface. In the end, I put it under the broiler until everything looked crisp and brown.

I guess I haven't sauteed anything in a very long time. I usually stick to roasting, broiling, and boiling. Everything turned out okay though! The hash was a delicious, lighter alternative to typical brunch dishes. I'm glad I made it, even though the cooking process was a little frenetic.

The brunch was great. There was challah french toast, granola and yogurt, fruit salad, vegetarian bloody marys (sans vodka), potatoes, apple rum raisin bread, lemon cookies, lemon madeleines, a frittata, orange juice, homemade gingerale, and coffee.

Vegetarian Sweet Potato Hash
adapted from Sara Foster's The Foster's Market Cookbook
serves 4

1 sweet potato, peeled and diced
1 tbsp unsalted butter
2 tbsp olive oil
1 red onion, chopped
1 red bell pepper, cored, seeded, and diced
1 pound vegetarian sausage (or skinless cooked turkey breast)
Salt and freshly ground black pepper, to taste
4 large eggs
1 tbsp chopped fresh chives
1 tbsp chopped fresh parsley

1. Place the diced potatoes in a saucepan and add enough water to cover by 1 inch. Bring to a boil and cook 3 to 4 minutes, until the potatoes are just barely tender; they should still be firm and hold their shape. Drain well and set aside.

2. Heat the butter and 1 tbsp olive oil in a large skillet over medium heat. Add the onion and red bell pepper and cook, stirring occasionally, 4-5 mins, until light brown.

3. Add the potatoes and cook 6-7 minutes, stirring occasionally, until potatoes are crispy. Add the remaining olive oil and the soysage/meat/etc. Season with salt and pepper and cook 1 to 2 minutes more, stirring occasionally.

4. Make four 3-inch holes in the hash and break an egg into each hole. Reduce heat to low, cover, and cook 4-5 minutes, until the eggs are cooked to the desired degree of doneness. Sprinkle with the chives, parsley and additional salt and pepper, if desired. Use a spatula to divide into portions and serve immediately.

Variations: Use chicken, smoked turkey, smoked trout, or sausage. Substitute red potatoes, yukon gold, or other potatoes and try other peppers instead of bell peppers.

Friday, April 25, 2008

Melting Chocolate Cookie Tartlets

Melting Chocolate Cookie Tartlets

Melting Chocolate Cookie Tartlets

I've been working through some untried recipes in Bittersweet. I had some tartlet crusts in the freezer and I filled them with this chocolate/nut meringue mixture.

I like this filling; it's easy to assemble, intensely chocolate flavored, and studded with chopped pecans. It doesn't have that crunchy, chalky meringue texture. I had extra filling left over, so I scooped piles onto a cookie sheet and baked them. This worked fine, and I enjoyed eating the cookies.

Next time I think i'll pipe the filling into the tart shells. I might put more filling in too; it has structure, so there's no danger of spilling.

Melting Chocolate Cookie Tartlets
adapted from Alice Medrich's Bittersweet

For the crust:
8 tbsp unsalted butter, melted
3 tbsp sugar
3/4 tsp vanilla extract
1/8 tsp salt
1 cup all purpose flour

For the filling:
6oz bittersweet or semisweet chocolate, coarsely chopped (50-62%. For 64-66%, use 5 oz)
2 large egg whites, at room temperature
1/8 tsp cream of tartar
1/2 tsp pure vanilla extract
1/4 cup sugar
3/4 cup chopped pecans or walnutes

Eight 4in tartlet pans, or 10 3.5in tartlet pans. (I used 12 very small tartlet tins and still had filling left over)

Position a rack in the lower third of the oven and preheat the oven to 350F.

To make the crust: Mix the butter, sugar, vanilla, and salt in a medium bowl. Add the flour and mix just until well blended. Don't worry if the dough seems too soft. Divide the dough into 8-10 equal pieces. Press one piece of dough very thinly and evenly across the bottom and up the sides of each tartlet pan. Place the pans on a cookie sheet. Bake for 15-20 minutes, until a deep golden brown.

While the crusts are baking, make the filling: Melt the chocolate in a medium heatproof bowl set in a wide skillet of barely simmering water, or in the microwave. Remove from the heat and stir until completely melted.

In a large bowl, beat the egg whites with the cream of tartar and vanilla until soft peaks form when you lift the beaters. Gradually add the sugar and continue to beat until the egg whites are stiff but not dry. Pour the nuts and all of the warm chocolate over the egg whites and fold with a rubber spatula until the color of the batter is uniform.

As soon as the tartlet crusts are ready, divide the filling equally among them. Make sure the batter touches the crust around all the edges. Return to the oven and bake the filling until it is dry or slightly cracked on top, about 10 minutes. Cool on a rack.

To unmold, use the point of a paring knife to loosen one edge of the crust from the pan, then tip the tarts into your hand. Serve warm or at room temperature.

Variations: Fold in 2 oz of crystallized ginger, finely chopped; 4 oz moist prunes, chopped into 1/4in pieces; 4 oz candied chestnuts, chopped. You can also substitute other nuts, like pine nuts.

Thursday, April 24, 2008

Green Tea Cookies w/ Cocoa Nibs

Almond Cookies w/ Matcha and Nibs

This recipe for Almond Sticks with Cocoa Nibs is one of my favorites. I sent a batch to my sister this week and made a second batch for myself. On a whim, I added a half tablespoon of matcha powder and cut the cookies smaller than usual. I loved the bright green color, but you couldn't really taste the green tea. It was very subtle.

On the bright side, I want to try more variations. I think citrus extract and zest, or instant espresso powder could be good.

My friend Dan recently tried the Foster's granola recipe, so I decided to make it again too.

Granola

It was more candy-like than I remembered, which isn't to say I don't like it. I just want to re-iterate that this granola is best eaten in small quantities. I like it for snacking and topping yogurt and desserts. Andy insists that it's wonderful with coffee ice cream.

I've also tried a few savory recipes lately: Molly Stevens's Braised Green Cabbage and James Beard's Chicken with 40 Cloves of Garlic. Both were quite good and easy to prepare.

I don't have any ambitious baking plans for the rest of the week; i'm doing some spring cleaning before I head to Los Angeles on Sunday.

Tuesday, April 22, 2008

Tiger Cake

Tiger Cake

Tiger Cake

Tiger Cake

How cool is this cake?!

I rarely notice this recipe when I leaf through Bittersweet. I think the page sticks. Or maybe, subconsciously, I think that marble cake tastes boring.

This is a recipe worth looking at. It's moist, easy to prepare, and more complex than typical recipes. Given the simplicity of the cake, I suggest using good cocoa, spices, and oil. I enjoy it lightly toasted, with coffee. I've been toasting everything these days...banana bread, muffins cut in half, you name it.

I felt childishly enthusiastic while making this. I loved the way the outside and inside looked. The individual slices had character; I think the one in the bottom photo looks like a bird! Other pieces reminded me of ships, tulips, and smiling faces.

The quantity is awesome too. I think I have enough cake to take to every class this week! I am confident it will be a hit.

Tiger Cake
adapted from Alice Medrich's Bittersweet

1/2 cup natural process cocoa powder
1/2 cup sugar
1/3 cup water

3 cups all purpose flour
2 tsp baking powder
1/4 tsp salt
2 cups sugar
1 cup flavorful extra-virgin olive oil
1 tsp pure vanilla extract
1/2 tsp finely ground white pepper
5 cold large eggs
1 cup cold milk

A 10-12 cup tube or bundt pan, or two 6 cup loaf pans.

Position a rack in the lower third of the oven and preheat the oven to 350F. Grease and flour the cake pan or line the loaf pans with parchment.

In a small bowl, whisk together the cocoa, sugar, and water until well blended.

Mix the flour, baking powder, and salt thoroughly and sift together onto a piece of paper. Set aside.

In a large mixer bowl (preferably fitted with the whisk attachment) beat the sugar, oil, vanilla, and pepper until well blended. Add the eggs one at a time, beating well after each addition. Continue to beat until the mixture is thick and pale, 3-5 minutes. Stop the mixer and add 1/3 of the flour mixture*. Beat on low speed until just blended. Stop the mixer and add half the milk. Beat just until it is blended. Repeat with another third of the flour, the remaining milk, and then the remaining flour.

Pour 3 cups of batter into another bowl and stir in the cocoa mixture. Pour 1/3 of the plain batter into the prepared tube pan (or divide it between the loaf pans) and top with 1/3 of the chocolate batter. Repeat with the remaining batters. Don't worry about marbling the batters- that happens during the baking**

Bake until a cake tester comes out clean, about 1 hour and 10 minutes for either the tube or loaf pans. Cool the cake in the pan(s) on a rack for about 15 minutes. Slide a thin knife around the sides of the pan(s) to release the cake. Invert the pan(s) and invert again, setting the cake right side up on a rack to cool completely.***

*I find it helps to fold the dry ingredients a few times with a spatula between additions.
**Don't try too hard when layering the batters. I just plopped big piles of batter in the pan and they came out beautifully.
***If you are using a tube pan, it can be hard to invert the cake. I used an offset spatula to release the cake from the sides and bottom of the pan, then I used two large, flat, icing spatulas to lift the cake from the removable portion of the pan and set it on a rack.

Friday, April 18, 2008

Madhur Jaffrey's Granola.

Granola

Granola

Making granola can be tricky. This is because no one seems to agree on what good granola is.

I'd say granola must contain oats, some form of fat and sweetener, and at least one other ingredient (nuts, dried fruits). Most importantly, it must be crunchy. From what i've seen, homemade granola usually falls in one of three categories:

1) Cereal.
Some recipes are reminiscent of muesli. They are simple, cluster-free and healthier than other varieties, but they have that chewy, raw oatmeal texture. Other recipes try to replicate box cereal by using flours or ground oats to bind small, uniform clusters.

2) Candy.
These granolas have huge chunks that are held together with lots of sugar and butter/oil. The amount of sugar results in a deep brown color and caramelized exterior. Sometimes they're loaded with coconut, chocolate, or peanut butter. When properly baked they're crispy and delicious. When under-baked, they get stuck in your teeth.

3) Not Granola.
Occasionally, i've ordered granola in a bakery and received a large bowl of what looks like caramelized nuts. Or a pile of dried fruit and nuts. I strongly believe granola needs a grain component, and a proper balance of other stuff.

My favorite granolas definitely fall in the candy category. I think of granola as a treat, not a health food. Foster's Homemade Granola is definitely my favorite. Melissa's Seven-Year Granola is also nice; it's more like very good boxed granola.

This recipe is from Madhur Jaffrey's World Vegetarian. It's a simple, not-too-sweet granola that's good with milk or yogurt. Because this recipe uses water, the granola takes an extremely long time to dry out. If the granola isn't completely dry by the end of the baking time, I suggest turning off the oven and leaving it to cool.

When you look for recipes, check the ratio of sugars/fats to dry ingredients. This is usually a good indicator of what texture the granola will have. Keep an eye on quantity too- this recipe makes twice what the Foster's recipe does. If you have too much, put it in bags and give it to friends!

Granola.
adapted from Madhur Jaffrey's World Vegetarian

4 1/2 cups (14oz) rolled oats
1 cup (2.5 oz) sliced, blanched almonds
1 cup (4 oz) untoasted sunflower seeds
1/2 cup (2 oz) sesame seeds (the beige kind)
1/2 cup canola or peanut oil, plus extra for greasing the tray
1 cup honey
1 tbsp dark brown sugar
1/4 tsp salt
1 cup (4 oz) raisins

Preheat the oven to 350F.

Put the oats, almonds, sunflower seeds, and sesame seeds in a large mixing bowl. Line a large baking tray/half sheet pan with greased foil.

Combine 1 cup water, 1/2 cup oil, honey, sugar, and salt in a small pan and bring to a simmer. Stir to mix and turn off the heat. Slowly pour this mixture over the oats, nuts, and seeds, and mix with a spatula until thoroughly moistened. Spread the granola out in the tray and then place the tray in the oven. Bake for 15 minutes. Toss Well. Turn the heat down to 275F and bake for another 45 minutes, tossing every 10-15 minutes. Now turn the heat down to 225F and bake for a further 20-30 minutes, tossing after every 10 minutes, until the mixture appears dry.* Remove the tray from the oven. Add the raisins. Toss the granola every now and then until it has cooled thoroughly. Store in a tightly closed jar. Makes 9 cups.

*If the granola is still damp, continue to toss and bake until nearly dry. Turn off the oven and leave the granola to cool.

Thursday, April 17, 2008

Warm Mocha Tart

Warm Mocha Tart

Warm Mocha Tart

While i've aspired (and sometimes still aspire) to a career in pastry, i've realized that I have little desire to replicate professional desserts at home. I am referring to desserts that employ advanced techniques, multiple components, garnishes, fancy plating, and expensive specialty equipment.

I feel very wistful when I look at Keiko's gorgeous pastries. This level of baking isn't practical for me right now: it takes time, space, money, and tools I don't have. I don't want to spend hours, days making a recipe if i'm not sure i'll like it, or if i'll have trouble storing it and giving it away.

For now, i'm content to bake in a manner that suits my lifestyle. I try to learn new techniques and recipes and execute them with care and creativity. I have a repertoire of good recipes and skills, and I know what I like to eat. More importantly, I know what my friends and co-workers like to eat.

Alice Medrich's Bittersweet is full of sophisticated recipes that require minimal effort. This warm mocha tart is fantastic and can be made in less than an hour. A simple filling of cream, butter, sugar, cocoa, espresso powder, and egg is poured into a hot tart crust and left to set in a turned-off oven.

The filling is something between silky chocolate pudding and very thick hot cocoa. By substituting different cocoas, extracts, and infusions, you can make any number of variations. It also slices well.

I used a Claudia Roden recipe for the crust. I love this tart dough; I've made it five or six times and it's always perfect. You can roll it very thin and as long as you bake it thoroughly it will be crunchy and full of flavor. I like to nibble on the extra scraps of dough or make them into cookies.

I ate this with some classmates last night and it didn't last long. I found it just as satisfying as anything i've ordered in a restaurant lately.

Warm Mocha Tart
adapted from Alice Medrich's Bittersweet

For the crust:
1 stick unsalted butter, melted
1/4 cup sugar
1/8 tsp salt
3/4 tsp pure vanilla extract
1 cup all purpose flour

For the filling:
3 tbsp unsalted butter, cut into chunks
1/2 cup sugar
1/4 cup unsweetened cocoa powder (natural or dutch process)
1 cup heavy cream
1 1/4 tsp instant espresso powder (or more to taste)
1/2 tsp pure vanilla extract
1 large egg, lightly beaten

A 9 1/2-inch fluted tart pan with removable bottom

For the crust:
1. Position a rack in the lower third of the oven and preheat the oven to 350°F (175°C).

2. Mix the butter, sugar, salt, and vanilla in a medium bowl. Add the flour and mix just until well blended. Don't worry if the dough seems too soft. Press all of the dough very thinly and evenly into the bottom and up the sides of the tart pan.

3. Bake for 20 to 25 minutes or until the crust is a deep golden brown.

For the filling:
1. Place the butter, sugar, cocoa powder, and cream in a medium saucepan and cook over medium heat, stirring, until the mixture is blended and smooth and begins to simmer around the edges. Remove from the heat and stir in the espresso powder and vanilla.

2. Just before the crust is ready, whisk the egg thoroughly into the hot chocolate mixture.

3. Pour the filling into the hot crust and turn off the oven. Leave the tart in the oven until it quivers like tender Jell-O in the center when the pan is nudged, about 10 to 12 minutes. Cool on a rack.

4. Serve the tart warm or at room temperature.

CHOCOLATE NOTE: Either natural or Dutch-process cocoa works well here. The former has a livelier, more complex, fruity flavor, while the latter has a cozy old-fashioned flavor reminiscent of chocolate pudding. You choose.

Tuesday, April 15, 2008

Braised Leeks with Dijon Vinaigrette

Braised Leeks

Braised Leeks

Sometimes, you just have to cook something that's not a dessert.

Here's a simple, elegant recipe for braised leeks. It is spring and I am trying to get excited about savory food again.

Monday, April 14, 2008

Chocolate Cake with Espresso Caramel Frosting

Chocolate Cake w/ Espresso Caramel Frosting

Chocolate Cake w/ Espresso Caramel Frosting

This is what was left of the second cake I took to work. The cake and frosting are both from The Cake Book by Tish Boyle.

The last time I made a chocolate cake recipe from this book, it was too moist to slice. I decided to test my flour measurements; the recipe calls for 2 2/3 cups or 322 grams all purpose flour.

I can be a little heavy handed with the flour, and my initial measurement weighed close to 370 grams. The second time, I tried gently spooning in and leveling the flour. This yielded close to 340 grams of flour. I had the same issues with the cocoa powder.

All of a sudden I couldn't remember how I normally measure the ingredients in this book. Normally i'd say pick one measuring scheme and stick to it. I really wish cookbooks told you if the recipes were primarily tested by weight or by volume.

Anyway, I added more flour than usual and my cakes turned out well. They didn't crown or crack much, and they were moist with a tight crumb. The espresso caramel buttercream was a nice touch to the otherwise traditional cake (please serve buttercream at room temperature).

No recipe today- i'm running out to grab a coffee and do some school work.

Friday, April 11, 2008

Strawberry Cream Cake.

Strawberry Cream Cake

Strawberry Cream Cake

Yesterday, we had a small reception at work for a recently married staff member. At the request of some co-workers, I baked two cakes: a strawberry cream cake and a chocolate cake with espresso caramel frosting.

I had a little trouble choosing recipes. I wanted the finished cakes to be fancier than average, but I didn't want them to be technically difficult or extremely time consuming. I knew I wanted to use strawberries; they've been on sale for weeks, and they're always popular and visually appealing.

Usually i'm against trying new recipes for parties, but I make exceptions for things in Cook's Illustrated. I've had this recipe mentally bookmarked since 2006. It's a simple cake filled with strawberries and a whipped cream/cream cheese mixture. The cake was good: light and spongy with enough structure to slice and move easily.

I built my cake inside of a setting ring to keep everything neat. I slightly over-whipped my filling, which made it difficult to spread over the chopped strawberries. It was much easier to pipe the filling and smooth it with a spatula. I garnished the cake with some melted white chocolate. I've posted a few more notes at the end of the recipe.

This cake was long gone before the chocolate one. It reminds me of my favorite trifle recipe, and I'll probably find an excuse to make it again soon.

Strawberry Cream Cake
from Cook's Illustrated

Cake
1 1/4 cups cake flour (5 ounces)
1 1/2 teaspoons baking powder
1/4 teaspoon table salt
1 cup sugar (7 ounces)
5 large eggs (2 whole and 3 separated), room temperature
6 tablespoons unsalted butter , melted and cooled slightly
2 tablespoons water
2 teaspoons vanilla extract

Strawberry Filling
2 pounds fresh strawberries (medium or large, about 2 quarts), washed, dried, and stemmed
4–6 tablespoons sugar
2 tablespoons Kirsch
Pinch table salt

Whipped Cream
8 ounces cream cheese , room temperature
1/2 cup sugar (3 1/2 ounces)
1 teaspoon vanilla extract
1/8 teaspoon table salt
2 cups heavy cream

1. FOR THE CAKE: Adjust oven rack to lower-middle position and heat oven to 325 degrees. Grease and flour round 9 by 2-inch cake pan or 9-inch springform pan and line with parchment paper. Whisk flour, baking powder, salt, and all but 3 tablespoons sugar in mixing bowl. Whisk in 2 whole eggs and 3 yolks (reserving whites), butter, water, and vanilla; whisk until smooth.

2. In clean bowl of standing mixer fitted with whisk attachment, beat remaining 3 egg whites at medium-low speed until frothy, 1 to 2 minutes. With machine running, gradually add remaining 3 tablespoons sugar, increase speed to medium-high, and beat until soft peaks form, 60 to 90 seconds. Stir one-third of whites into batter to lighten; add remaining whites and gently fold into batter until no white streaks remain. Pour batter into prepared pan and bake until toothpick or wooden skewer inserted into center of cake comes out clean, 30 to 40 minutes. Cool in pan 10 minutes, then invert cake onto greased wire rack; peel off and discard parchment. Invert cake again; cool completely, about 2 hours.

3. FOR THE STRAWBERRY FILLING: Halve 24 of best-looking berries and reserve. Quarter remaining berries; toss with 4 to 6 tablespoons sugar (depending on sweetness of berries) in medium bowl and let sit 1 hour, stirring occasionally. Strain juices from berries and reserve (you should have about 1/2 cup). In workbowl of food processor fitted with metal blade, give macerated berries five 1-second pulses (you should have about 1 1/2 cups). In small saucepan over medium-high heat, simmer reserved juices and Kirsch until syrupy and reduced to about 3 tablespoons, 3 to 5 minutes. Pour reduced syrup over macerated berries, add pinch of salt, and toss to combine. Set aside until cake is cooled.

4. FOR THE WHIPPED CREAM: When cake has cooled, place cream cheese, sugar, vanilla, and salt in bowl of standing mixer fitted with whisk attachment. Whisk at medium-high speed until light and fluffy, 1 to 2 minutes, scraping down bowl with rubber spatula as needed. Reduce speed to low and add heavy cream in slow, steady stream; when almost fully combined, increase speed to medium-high and beat until mixture holds stiff peaks, 2 to 2 1/2 minutes more, scraping bowl as needed (you should have about 4 1/2 cups).

5. TO ASSEMBLE THE CAKE: Using large serrated knife, slice cake into three even layers. Place bottom layer on cardboard round or cake plate and arrange ring of 20 strawberry halves, cut sides down and stem ends facing out, around perimeter of cake layer. Pour one half of pureed berry mixture (about 3/4 cup) in center, then spread to cover any exposed cake. Gently spread about one-third of whipped cream (about 1 1/2 cups) over berry layer, leaving 1/2-inch border from edge. Place middle cake layer on top and press down gently (whipped cream layer should become flush with cake edge). Repeat with 20 additional strawberry halves, remaining berry mixture, and half of remaining whipped cream; gently press last cake layer on top. Spread remaining whipped cream over top; decorate with remaining cut strawberries. Serve, or chill for up to 4 hours.

(Notes: don't underwhip or overfold the egg whites, or your cake may end up flat and dense. The cake is easiest to slice when it's well chilled, and thicker slices will hold together better. Next time I might add a little gelatin to the whipped cream mix. I substituted rum for kirsh, and next time I might throw in a little almond extract. The sponge cake can be wrapped and frozen-just let it defrost on a counter for 2 hours, unwrapped, before using.)

Tuesday, April 8, 2008

Baked French Toast.

Baked French Toast

One of my favorite things about reading food writing is learning that someone else has experienced the embarrassment, failure, and frustration that often comes with culinary self-indoctrination.

I recently finished reading The Amateur Gourmet by Adam Roberts. In the introduction, he attempts to make a fish en papillote with wax paper. He also forgets the butter in a very expensive coffee cake, and ruins several batches of Nancy Silverton's caramel corn. It was so nice to see that someone else feeds his garbage can on a regular basis.

Perfection seems to be the ideal in cooking and blogging. We'd like to pretend all of our photos and baked goods are perfect. We'd like to appear as though we can manage a career, a family, a budget, a social life, an education, and a culinary schedule that involves cooking multiple times a day, blogging, maintaining a flickr page, participating in on-line events, reading food magazine and news articles, and watching a good dose of food television.

If you can manage all of that, congratulations. No wonder bloggers are dying of heart attacks. Just in the process of writing this post I have ruined a batch of buttercream (this buttercream, in fact).

I am giving you this recipe I made last week for two reasons: it's insanely easy to make, and it takes like it took three times as much effort. Cooking really doesn't have to take a ton of effort, and if you're like me you could use a break. A break that includes a really indulgent, badly photographed breakfast.

Deep Dish Brioche French Toast
adapted from Leite's Culinaria

Ingredients:
Butter for greasing the pan
One 24-oz brioche or challah loaf, cut into 1 inch cubes
8 oz cream cheese, cut into 18 cubes (I prefer much smaller cubes)
3/4 cup chopped pecans or walnuts
1/2 cup raisins (or dried cherries, or fresh blueberries, etc.)
8 large eggs
2 cups milk
1/2 cup firmly packed dark brown sugar
2 tsp vanilla extract
1 tsp cinnamon
pinch of nutmeg
pinch of cloves
4 tbsp melted butter

To serve:
Powdered sugar
Pure maple syrup, warmed

1. Generously butter a 9x13 inch baking dish (I used a glass pyrex). Place half the bread cubes in a single layer, filling in all the gaps. Evenly scatter the cream cheese cubes, nuts, and raisins on top. Cover completely with the remaining bread cubes.

2. In a large bowl, whisk together the eggs, milk, brown sugar, vanilla, cinnamon, nutmeg, and cloves. Evenly pour the egg mixture over the bread cubes. Gently press down on the cubes with your palms to allow the top layer of bread to absorb the liquid. Cover with plastic wrap and refrigerate four hours or overnight.

3. Heat the oven to 350F (175C). Meanwhile, remove the dish from the refrigerator and let sit 20 minutes at room temperature. Bake the french toast covered for 20 minutes; uncover and bake 15-20 minutes longer, or until the cubes are nicely toasted and there's no liquid pudding on the bottom. Transfer the dish to a rack and drizzle the melted butter on top. Run a knife around the rim of the pan to release the french toast. Let sit 5 minutes. Cut into squares, arrange on individual plates, sprinkle with powdered sugar, and serve with the warmed maple syrup.

Sunday, April 6, 2008

Pecan Roulade w/ Praline Mousse

Pecan Roulade w/ Praline Mousse

Pecan Roulade w/ Praline Mousse

I looked through Susan Spicer's Crescent City Cooking in the library a few weeks ago but didn't check it out. Last week, it was featured on Leite's Culinaria, one of my favorite sites for recipes. This pecan roulade caught my eye; it looked sophisticated, delicious, and relatively easy to make. It's also gluten-free!

I was stressed about a school project, so naturally I felt like baking. I could make the caramel syrup a day before, make the cake right before my big presentation, and assemble the cake when I got home. By then the cake would be cool and all the mousse ingredients would be at room temperature.

The baking process was relatively easy; however, the original recipe said to cover the cake with a damp dish towel and my cooled cake was sticky, wet, and difficult to roll. Most roulade recipes suggest inverting the briefly cooled cake onto a clean dish towel and rolling it up to cool before filling. Next time i'd try this method.

This cake tastes strongly of pecans, caramel, and rum (I think it's fantastic). Most of the components can stand alone. I'd use the caramel mousse for filling layer cakes or cream puffs, and the caramel syrup would be great on ice cream or chilled and spread on toast. It's especially good with the cream cheese before you add the whipped cream and gelatin.

Pecan Roulade w/ Praline Mousse
adapted from Susan Spicer's Crescent City Cooking

For the cake:
7 oz pecans (about 1 cup), lightly toasted
1/2 tsp baking powder
7 eggs, separated (don't get any yolks in the whites!)
1/2 cup + 2 tbsp granulated sugar

For the praline syrup:
1 cup sugar
1/2 cup water
1 cup heavy cream
1 tsp pure vanilla extract
bourbon or rum to taste

For the praline mousse:
4 oz cream cheese, softened
1 cup reserved praline syrup
1 tsp pure vanilla extract
3/4 tsp unflavored gelatin
1 1/2 tbsp dark rum
1 cup heavy cream, whipped to firm peaks
confectioners' sugar for dusting (optional)

Make the cake:
1. Line an 18 x 12-inch baking pan with parchment paper and lightly grease the parchment or spray it with nonstick spray. Preheat the oven to 375°F (190°C).

2. Pulse the pecans in a food processor until you have a coarse meal. Transfer to a medium bowl and toss with the baking powder.

3. Whip the yolks with 1/4 cup of the granulated sugar in an electric mixer at high speed until thick and pale. Stir into the nut mixture. Using a clean beater and a clean mixing bowl, whip the egg whites at medium speed until foamy. Whip at high until soft peaks begin to form. Gradually add the remaining 1/4 cup plus 2 tablespoons granulated sugar. Stop the mixer and pull the beater out slowly: if the whites leave stiff peaks in the bowl, the mixture is ready (it should be stiff but not dry).

4. Fold the whites into the yolk mixture one half at a time. Avoid the urge to overmix. Spread the batter evenly into the prepared pan.

5. Bake until light golden brown, 10-12 minutes. Remove the cake from the oven and immediately cover with a clean dish towel; cool completely.

Make the praline syrup:
1. Put the sugar and water in a small, heavy-bottomed saucepan and place over high heat. Stir to combine. Put the cream in another small saucepan and bring it just short of a boil. Remove from heat and set aside.

2. Bring the sugar mixture to a boil and then down to a steady simmer. When the liquid turns amber, swirl the pan. This will help it caramelize evenly. When it reaches a deep amber color, remove it from the heat and very carefully whisk in the cream. It will bubble up and steam, so watch those fingers! Return the pan to the heat and whisk to dissolve all the caramel. Refrigerate 1 cup of the praline syrup for the mousse filling. Add the vanilla and bourbon to the rest for your sauce.

Make the mousse:
1. Cream the cream cheese by hand or in an electric mixer fitted with the whisk attachment. Slowly add the praline syrup, scraping the bowl frequently. Add the vanilla. Place the gelatin in a small bowl with about 1 tablespoon warm water. Add the rum to the gelatin and stir to dissolve. Fold a bit of the praline syrup into the gelatin, then fold the gelatin mixture back into the praline syrup. Fold in the whipped cream, one half at a time.

Assemble:
1. Run a paring knife around the outside of the cake to release it from the sides of the pan. Lift the edges carefully, feeling under the cake to loosen it. Sift a thin layer of confectioners' sugar onto the top of the cake. Lay a piece of parchment the size of the cake across the top, then turn the pan over to release the cake onto the parchment. With the cake lying on the counter, carefully peel the parchment that is now on the top off the cake.

2. Spread the mousse on the cake, stopping 1/2 inch from the long edge. Starting with the long edge closest to you, begin rolling the cake up jelly roll style, using the parchment for support. Tuck the rolling edge of the cake in as you go to make it a little tighter and neater. Place the cake back on the baking pan and refrigerate to firm it up.

3. To serve, sprinkle with confectioners' sugar, cut the slices about 1 inch thick, and serve with a generous drizzle of the reserved praline syrup. Garnish with fresh strawberries or peaches, if desired.

Friday, April 4, 2008

Matcha Financiers

Matcha Financiers

Matcha Financiers

I wanted to make green tea financiers, but I wasn't feeling confident enough to try a new recipe. I enjoyed this recipe for financiers, so I figured i'd play around with it and hope for the best.

Sometimes you can learn more from repeat recipes than new ones. I did a much better job making the browned butter. I worried i'd burned it, but it was perfectly nutty and rich. I added about 1/2 tablespoon of matcha powder to the dry ingredients. That was plenty; the resulting batter was bright green.

Next time, i'd omit some of the cake flour. I didn't change the other measurements, so my cakes were a little drier than usual. They domed too, which I think was a matter of too much flour and overbeating.

I haven't made many financiers, so let me know if you have any particularly good recipes. I might try some of the variations in The Sweet Life or a Payard/Pierre Herme book.