Monday, July 28, 2008

Lenox Almond Biscotti

Lenox Almond Biscotti

Lenox Almond Biscotti

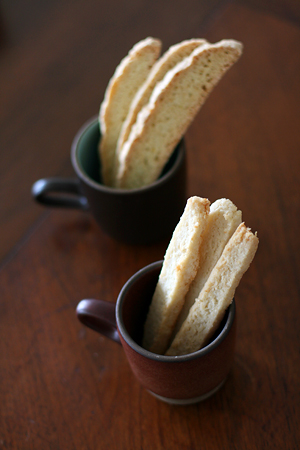
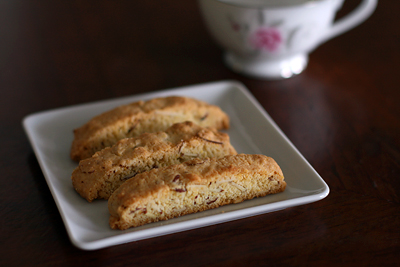
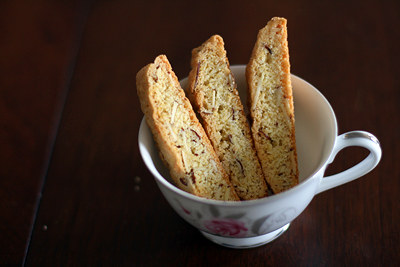
Finally, a biscotti recipe I love.

Lenox Almond Biscotti
from Dorie Greenspan's Baking From my Home to Yours

1 1/2 cups all-purpose flour
1 1/2 teaspoons baking powder
1/4 teaspoon salt
1/2 cup yellow cornmeal
1 stick (8 tablespoons) unsalted butter, at room temperature
1 cup sugar
2 large eggs
1 1/2 teaspoons pure almond extract
3/4 cup sliced almonds, blanched or unblanched

GETTING READY: Center a rack in the oven and preheat the oven to 350 degrees F. Line a baking sheet with parchment or a silicone mat.

Whisk the flour, baking powder and salt together. Add the cornmeal and whisk again to blend.

Working with a stand mixer, preferably fitted with a paddle attachment, or with a hand mixer in a large bowl, beat the butter and sugar together at medium speed for 3 minutes, until very smooth. Add the eggs and continue to beat, scraping down the bowl as needed, for another 2 minutes, or until the mixture is light, smooth and creamy. Beat in the almond extract. Reduce the mixer speed to low and add the dry ingredients, mixing only until they are incorporated. You'll have a soft, stick-to-your-fingers dough that will ball up around the paddle or beaters. Scrape down the paddle and bowl, toss in the almonds and mix just to blend.

Scrape half the dough onto one side of the baking sheet. Using your fingers and a rubber spatula or scraper, work the dough into a log about 12 inches long and 1 1¿2 inches wide. The log will be more rectangular than domed, and bumpy, rough and uneven. Form a second log with the remaining dough on the other side of the baking sheet.

Bake for 15 minutes, or until the logs are lightly golden but still soft and springy to the touch. Transfer the baking sheet to a rack and cool the logs on the baking sheet for 30 minutes.

If you turned off the oven, bring it back up to 350 degrees F.

Using a wide metal spatula, transfer the logs to a cutting board and, with a long serrated knife, trim the ends and cut the logs into 3/4-inch-thick slices. Return the slices to the baking sheet — this time standing them up like a marching band — and slide the sheet back into the oven.

Bake the biscotti for another 15 minutes, or until they are golden and firm. Transfer them to racks and cool to room temperature.

Saturday, July 26, 2008

Sbrisolona, revisited.

Sbrisolona, revisited.

White Gazpacho

Let's pretend, for a moment, that I didn't forget the butter in the refrigerator while making this almond cake. Instead, let's pretend that you asked what would happen, Lisa, if I made your sbrisolona without any butter?

Not much, actually. The finished cake is slightly drier, but not so much so that it loses its chewy, dense consistency. In some ways, this cake turned out better than the previous version; it had better volume and texture, probably because I took more care whipping the eggs and erring on the lighter side of the flour measurement.

The second photo is a white gazpacho from last week's dinner party. The recipe involves cucumbers, almonds, grape juice, bread, and several other ingredients I don't remember. It was really refreshing, and the spicy oil on top was a nice touch.

On another note, I had a lovely dinner at Legume; the peach shortcakes were fantastic. The shortcake itself was something like a biscuit and a very rich piece of shortbread.

I also purchased a dining table. I am going to recover the chairs with this bright, stripey fabric. It has two extra leaves, and i'm going to acquire a few more chairs.

Not much else is new. I move in a week, and by then I should feel ready for some more ambitious baking.

table

Tuesday, July 22, 2008

Almond-less Biscotti and Coconut Sticks

Biscotti

Biscotti and Coconut Sticks

Some of my favorite "biscotti" are just biscotti-shaped butter cookies. I suppose whether or not you like biscotti depends on how you define them. Are Almondinas biscotti? What about Mediterra's decadent chocolate-hazelnut cookies?

I usually associate the term with crunchy, twice-baked cookies that don't involve much butter. I'd say once you make something richer than the biscotti at Enrico's, you're making cookies.

When you read a biscotti recipe, consider the ingredients. Egg whites will make the dough stiffer and crunchier. Egg yolks and butter will contribute to a richer taste and crumbly texture.

I tried two different biscotti recipes last week: Cook's Illustrated's spiced biscotti, and Alice Medrich's almond biscotti (minus the whole almonds). Both recipes omitted butter. One called for 3 eggs, while one called for 2 eggs and 2 yolks. While both recipes insisted the final cookies would be crunchy but not tooth-breaking, I found them slightly too hard.

I much preferred Alice Medrich's coconut sticks, which are very similar to the almond sticks with cocoa nibs I make so frequently. They are once baked, biscotti-shaped cookies that are pleasantly crunchy and rich tasting. I really liked the coconut taste- they reminded me of these macaroons from my childhood, only fancier and more delicate.

I'll leave you with recipes for the almond biscotti and coconut sticks, which are pictured above. If you have a great recipe, let me know. I would love to be able to replicate Mediterra's biscotti...they're pretty amazing.

Almond Biscotti
from Alice Medrich's Cookies and Brownies

2 cups all purpose flour
1 cup sugar
1 tsp baking powder
1/8 tsp salt
3 large eggs
2 tbsp amaretto, or 2 tbsp rum with 1 tsp almond extract
1 tsp vanilla extract
1 tsp anise extract (optional)
1 cup whole almonds, toasted and chopped
Cookie sheet, lined with parchment or greased and floured

Preheat the oven to 300F. Position a rack in the middle of the oven.

Combine the flour, sugar, baking powder, and salt in a medium bowl and mix together thoroughly with a whisk or fork. Set aside.

Whisk the eggs, amaretto, vanilla, and anise extract, if using, in a large bowl until well blended. Stir in the flour mixture and then the almonds. The dough will be thick and sticky. Scrape the dough into a long log shape lengthwise on the cookie sheet. Flour your hands and shape the dough into a long flat loaf about 10 inches long and 5 inches wide.

Bake until firm and dry, about 50 minutes. Remove from the oven and let cool for about 10 minutes. Transfer the loaf carefully to a cutting board. Using a long serrated knife, cut the loaf on the diagonal into slices 1/2 inch wide. Lay the slices, cut side down, on the cookie sheet. Bake for 20 minutes; turn each cookie over and bake for 15-20 minutes longer, or until the cookies are golden brown. Place the cookie sheet on a rack to cool. Cool the cookies completely before stacking or storing. May be stored, airtight, for several weeks.

Coconut Sticks
from Alice Medrich's Cookies and Brownies

6 tbsp unsalted butter, softened
2/3 cup sugar
1/4 tsp salt
1 tsp vanilla extract
1 cup unsweetened dried coconut
1 cup + 2 tbsp all purpose flour
2 tbsp water
1 or 2 cookie sheets, lined with parchment or greased (I didn't bother greasing or lining them)

Using the back of a large spoon or with an electric mixer, in a medium bowl mix the butter with the sugar and salt until smooth and creamy, not at all fluffy. Mix in the vanilla. Mix in the coconut. Add the flour and mix with your fingers, pinching and gathering the mixture until it resembles damp crumbs. Drizzle in the water and continue to mix with your fingers, pinching and gathering the dough until the water seems well distributed. The dough will not form a smooth, cohesive mass; it will be crumbly, but it will stick together when you press it. Turn it out onto a large sheet of foil. Press the dough into a 6x9 inch rectangle a scant 1/2 inch thick. Fold the foil over the rectangle, and wrap the dough airtight. Slide a cookie sheet under the package and refrigerate it for 2 hours or overnight.

(*Or, you can do all of that in a food processor. Pulse the flour, sugar, and salt. Add the butter, chilled and cut into pieces, and pulse until the mixture looks well combined/sandy. Add the water and vanilla and pulse until the mixture begins to look damp. Add the coconut and pulse until the mixture starts to clump together. Turn out onto a piece of foil and continue with the recipe)

Preheat the oven to 350F. Position rack in the upper and lower thirds of the oven.

Use a long sharp knife to trim 1 short edge of the dough rectangle. Then cut a slice a scant 3/8 inch wide. Use the knife to transfer the slice to the cookie sheet, placing it cut side up. Cut and transfer each slice, placing them at least 1 inch apart. If some break, just push them back together or bake them broken; they will look and taste great anyway.

Bake for 12-14 minutes, or until the cookies just begin to turn golden at the edges. Rotate the cookie sheets from top to bottom and front to back halfway through the baking time to ensure even baking.

Slide the parchment carefully onto a rack or set the pan itself on a rack to cool. Cool cookies completely before stacking or storing. Cookies are most delicious on the day they are baked (*I disagree). May be stored, airtight, for several days.

Sunday, July 20, 2008

Strawberry Trifle

Strawberry Trifle

Strawberry Trifle Fixings

There are moments when baking is extremely satisfying, and in the case of this strawberry trifle that moment was not when I unveiled it at the dinner party. It was the moment when, having assembled the trifle and put it in the refrigerator, I picked up the bowl of leftover angel-food cake and proceeded to wipe out and eat the contents of the whipped cream and berry covered mixing bowls and utensils that had accumulated on the counter.

I suppose that belongs on the list of indulgent culinary behaviors that are slightly discouraged: licking spatulas, eating raw cookie dough, picking at streusel and the edges of pie crusts, not giving things enough time to cool, etc. It is hard to resist leftover cake, cream, and macerated berries.

Almost everything about this trifle is indulgent. I got the recipe from my neighbor Carol who used to make it every year for her Christmas Eve parties. I've made it for several dinner parties where it usually leads to rave reviews and occasionally stomachaches. This was definitely the case last night- we were already stuffed on milk chocolate-guinness ice cream before the trifle made it out of the fridge.

This is a great recipe for summer that's relatively simple in terms of ingredients and process. The recipe itself is mostly a guideline; I always play around with the amounts of almond or vanilla extracts I use, and I substitute different berries or cake. Giant Eagle had surprisingly good berries on sale this week, so I didn't have any problems.

Carol's Strawberry Trifle
Note: this recipe is pretty loosely adapted because I lost my original copy. I rarely measure anything exactly, and it comes out differently almost every time!

1 large, store-bought angel food cake (about 10 inches, or 2 smaller ones), cut or torn into cubes
3 pints strawberries (I usually use two quarts), sliced or quartered
1.5 cups powdered sugar
3/4 cup granulated sugar
almond extract
1 cup sour cream, at room temperature
8 oz cream cheese, at room temperature
1 pint whipping cream, chilled
vanilla extract

1. In a bowl, mix the strawberries with the granulated sugar and some almond extract. Set aside to macerate.

2. Beat together the cream cheese, sour cream, and 3/4 cup powdered sugar until smooth*. In a separate bowl, beat the whipped cream, adding 3/4 cup powdered sugar and some vanilla extract when it begins to look almost done (firm peaks). Fold the whipped cream gently into the cream cheese mixture.

3. Layer the ingredients in a large bowl or trifle dish, starting with cake, followed by strawberries, then cream. You should be able to make 3 layers. The trifle is best chilled for a while before serving.

*the cream cheese mixture can be lumpy if your ingredients are too cold. You can use a food processor if this is a problem.

Sunday, July 13, 2008

Pressed Sandwiches

Pressed Sandwich

Pressed Sandwich

I'm watching The Iron Giant in the park with friends tonight. Right now my kitchen is in boxes, so my cooking repertoire is somewhat limited. I decided early on that if I couldn't bake, i'd just make a giant sandwich.

After some coffee and pastry in the Strip District, I bought a ciabatta, fresh mozzarella, basil, and tomatoes from Penn Mac and the Farmer's Market. Using a Martha Stewart recipe as a guide, I assembled this sandwich and weighted it down with a dutch oven and some jelly jars.

I'm quite pleased with how it turned out. It's perfect for picnics and parties. I've posted the original recipe below, but I only used it as a guideline. Here are some of my notes:

I prefer to stir in the parmesan by hand after the remaining pesto ingredients have been food-processed. The garlic can be overpowering, so err on the light side or omit it completely. Lastly, if you choose to use tomatoes, slice them thinly and place them on the thicker half of the bread to prevent the liquid from soaking through.

I'm looking forward to trying other variations!

Pressed Sandwiches
from Martha Stewart Magazine
2 cups fresh basil leaves, rinsed and dried
1/2 cup freshly grated Parmesan cheese
1/3 cup pine nuts, lightly toasted
2 garlic cloves, coarsely chopped
1/2 teaspoon coarse salt
1/4 teaspoon freshly ground pepper
1/2 cup plus 1 tablespoon extra-virgin olive oil
1 red bell pepper (about 7 ounces)
1 small eggplant (about 8 ounces), cut lengthwise into 1/4-inch-thick slices
1 zucchini (about 8 ounces), cut lengthwise into 1/4-inch-thick slices
1 yellow summer squash (about 7 ounces), cut lengthwise into 1/4-inch-thick slices
Extra-virgin olive oil, for brushing
Coarse salt and freshly ground pepper
2 loaves ciabatta (each about 8 by 10 inches), halved horizontally
1 pound fresh mozzarella cheese, cut into 1/4-inch-thick slices
1/3 pound thinly sliced prosciutto

Make the pesto: Pulse basil, Parmesan, pine nuts, garlic, salt, and pepper in a food processor until combined. With machine running, add 1/2 cup oil in a slow, steady stream. Transfer to a small airtight container, and top with remaining oil. Pesto can be refrigerated overnight.

Preheat grill or grill pan to medium-high. (If you are using a charcoal grill, coals are ready when you can hold your hand 5 inches above grill for just 3 to 4 seconds.) Grill bell pepper, turning with tongs, until blackened all over. Place in a bag, close bag, and steam 15 minutes. Peel pepper, and discard skin.

Lightly brush both sides of eggplant, zucchini, and summer squash with oil, and season with salt and pepper. Grill, flipping once, until golden brown and soft, 3 to 4 minutes per side.

Pull out most of the doughy center of bread, and reserve for another use (such as breadcrumbs). Brush inside of each loaf with oil. Spread pesto over bottom half of each loaf. Top one loaf bottom with grilled vegetables and half the mozzarella; top remaining loaf bottom with prosciutto and remaining mozzarella. Sandwich top and bottom of each loaf, and press firmly.

Tightly wrap each sandwich in plastic, allowing air to release before sealing. Wrap each in parchment paper, and tie with kitchen string. Place sandwiches in refrigerator, and weigh down with a heavy object (such as a Dutch oven). Refrigerate at least 2 hours (or overnight). Slice, and serve.

Saturday, July 5, 2008

Raspberry Squares

Raspberry Squares

I think I prefer these Raspberry Squares to my usual Oatmeal Coconut Raspberry Bars. They're easy to make (the recipe is essentially a large batch of streusel), they slice neatly, and their crispy-yet-chewy texture is fantastic.

I was impatient to eat them. Consequently, all of the photos turned out slightly unfocused. Don't let that deter you from trying the recipe. These cookies would nicely complement some assorted petit fours or tea time sweets. I like to cut them into small 1-1.5 inch squares.

Raspberry Squares
from Cook's Illustrated

1 1/2 cups unbleached all-purpose flour (7.5 ounces)
1 1/4 cups quick-cooking oats
1/3 cup granulated sugar (2.3 ounces)
1/3 cup packed light brown sugar
1/4 teaspoon baking soda
1/4 teaspoon table salt
1/2 cup finely chopped pecans or almonds, or a combination (I used walnuts)
12 tablespoons unsalted butter (1 1/2 sticks), cut into 12 pieces and softened by still cool
1 cup rasberry preserves

1. Adjust oven rack to lower-middle position and heat oven to 350 degrees. Spray 9-inch-square baking pan with nonstick cooking spray. Fold two 16-inch pieces of foil lengthwise to measure 8 inches wide. Fit one sheet in bottom of greased pan, pushing it into corners and up sides of pan (overhang will help in removal of baked squares). Fit second sheet in pan in same manner, perpendicular to first sheet. Spray foil with nonstick cooking spray.

2. In bowl of standing mixer, mix flour, oats, sugars, baking soda, salt, and nuts at low speed until combined, about 30 seconds. With mixer running at low speed, add butter pieces; continue to beat until mixture is well-blended and resembles wet sand, about 2 minutes.

3. Transfer 2/3 of mixture to prepared pan and use hands to press crumbs evenly into bottom. Bake until starting to brown, about 20 minutes. Using rubber spatula, spread preserves evenly over hot bottom crust; sprinkle remaining oat/nut mixture evenly over preserves. Bake until preserves bubble around edges and top is golden brown, about 30 minutes, rotating pan from front to back halfway through baking time. Cool on wire rack to room temperature, about 1½ hours, then remove from pan using foil handles. Cut into 1¼- to 1½-inch squares and serve.

Tuesday, July 1, 2008

Yoghurt and Passionfruit Syrup Cake

Yogurt and Passionfruit Cake

Yogurt and Passionfruit Cake

A recent issue of Donna Hay Magazine featured a beautifully photographed spread on passion fruit desserts. The pictures, along with memories of making passion fruit sorbets and chocolate/passion fruit ganache tarts at work, were too much. I needed to bake. It had to be today, and it had to involve passion fruit.

I decided to bake the yoghurt and passion fruit syrup cake. I imagine bakers in Australia and New Zealand are knee deep in passion fruit. Passion fruit must be economical somewhere, otherwise the magazine wouldn't have published so many recipes requiring so much pulp. I hear you can buy it in cans.

Some fruits are ridiculously priced in Pittsburgh stores. Today, I saw fresh figs for 1.60 each. Passion fruits were 1.99 each. I only bought enough for half of the passion fruit syrup recipe, and even then it was painful. On Saturday I will see if the Strip District has better deals.

I split the batter between two loaf pans and glazed one of the finished cakes. It was good; the passion fruit syrup paired well with the moist, light, and tangy cake. I cooked the syrup a little too long, so it was more jammy than syrupy. Some people might not like the seeds, but I don't mind them.

This cake is great with tea. It's simple and elegant, but it's not worth breaking the bank. If you feel compelled to buy passion fruits, I suggest using them for curd or a longer-lasting component. If I find some for a better price, i'll probably try the magazine's cheesecake slice recipe.

Yoghurt and Passionfruit Syrup Cake
adapted from Donna Hay Magazine
yoghurt cake
150g butter, softened
1 cup (220g) caster (superfine) sugar [regular sugar works.]
1 tsp vanilla extract
3 eggs
1 cup thick Greek-style natural yoghurt [2% is fine.]
2 cups (300g) self-raising flour, sifted [or 2 cups all purpose flour + 1 tbsp baking powder +1 tsp table salt]

passionfruit syrup
1 cup (250ml) passionfruit pulp
1/2 cup (125ml) water
1/2 cup (110g) caster (superfine) sugar

Preheat the oven to 160C/320F. To make the passionfruit syrup, place passionfruit pulp, water and sugar in a small saucepan over medium heat and stir until sugar is dissolved. Bring to a boil, reduce the heat to low and cook for 10-15 minutes or until syrupy. Set aside.

Place the butter, sugar and vanilla in the bowl of an electric mixer and beat for 10-15 minutes or until pale and creamy. Add the eggs one at a time, beating well after each addition. Add yoghurt and beat until well combined. Fold in the flour. Spoon mixture into a lightly greased 24cm/9in bundt pan and bake for 35 minutes or until cooked when tested with a skewer. Remove cake from the tin and place on a serving plate. Spike all over with a thin skewer, drizzle cake with syrup and serve while still warm. Serves 8.