Showing posts sorted by relevance for query lemon. Sort by date Show all posts

Monday, June 23, 2008

Lemon Bars

Lemon Bars

My only copy of this recipe says something like: Make crust, press into pan, bake 15 minutes. Make filling, pour onto crust, spread evenly, bake 20 minutes. Make glaze. Drizzle over lemon filling. Cool and cut into bars.

There's little need for directions when you've made a recipe dozens of times. These lemon bars have been my aunt's signature for years, and I learned to make them from her. I've made them for friends, family, coworkers, roommates, customers, and the occasional random stranger.

I've made these lemon bars so many times that I can't remember if I copied the original recipe correctly. Maybe I forgot some salt or vanilla. I can never remember if "brown sugar" means light or dark. I play around with techniques, ingredients, temperatures, and baking times. The bars always turn out well though.

I can give you some tips: make sure the butter is well combined- large pieces can melt and weaken your crust. Keep an eye on the bars after 13-15 minutes, especially if your oven is hot (I rarely need all 20 minutes). Thicker glaze is better than thinner- if it's too thin, it will soak into the bars instead of hardening into a crisp sugar glaze.

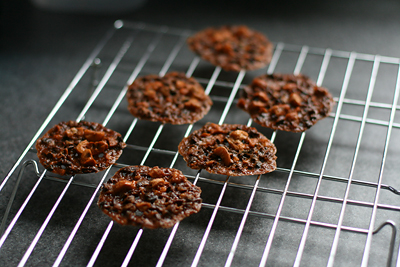
That said, these are easy to make. I think they're simple, elegant, and terribly addictive. To clarify, these aren't the butter-yellow treats most people associate with the term "lemon bars." They consist of a shortbread crust, a sugar/nut filling more typical to pecan bars, and a lemon icing.

Lemon Bars

for the crust:
½ cup unsalted butter, softened
½ cup granulated sugar
1 ¼ cups all purpose flour
Zest of ½ lemon

for the filling:
1 cup brown sugar
¼ cup all purpose flour
Zest of ½ lemon
¼ tsp baking powder
2 large eggs, beaten
1 cup walnuts or macadamia nuts, chopped

for the glaze:
1 cup confectioners' sugar
1 tbsp unsalted butter, melted
2 tsp lemon juice, more if needed

Preheat the oven to 350 degrees.

Make the crust. In a medium bowl, whisk together the flour, sugar, and lemon zest, then cut in the butter. This can also be done with a food processor. Press the dough into a 9x13 inch pan. Bake for 15 minutes.

Meanwhile, make the filling. In another bowl, combine the flour, baking powder, zest, and brown sugar. Mix in the eggs, then add the nuts. Pour filling onto the hot crust. Spread evenly and bake for 15-20 minutes, until evenly browned.

Prepare the glaze. Mix together the sugar, butter, and lemon juice. Add more lemon juice until the glaze is pourable, but still quite thick. Drizzle or pipe the glaze over the hot lemon filling. Cool completely in the pan on a wire rack, then cut into bars. The bars keep, ship, and freeze quite well.

Monday, January 28, 2008

A Fantastic Lemon Meringue Pie

Lemon Meringue Pie

Lemon Meringue PIe

This is the best lemon meringue pie i've had since elementary school. My best friend's grandmother Thelma would make pies and teach me about pinochle. I measure all lemon meringue pies against hers.

So many lemon meringue pies aren't worth eating: they're too sweet, too sour, soggy crusted, sloppy looking, filled with nasty yellow goop, or topped with weeping meringue.

I had a feeling this recipe would be good. I guessed that the use of gelatin sheets and Italian meringue would make the pie cohesive, easy to slice, and pretty to look at. The photo was gorgeous; I stuck it on the refrigerator and decided I had to try it.

Instead of the printed crust recipe, I used the graham cracker dough from Claudia Fleming's The Last Course. It's flavored with cinnamon, honey, brown sugar, and a little whole wheat flour. I thought it was a nice change that took an edge off the sweetness and made the flavor more complex. It stayed nice and crisp too. The lemon curd was nice and tart, and I love the Italian meringue! It's very fluffy and marshmallow-like.

Ironically, I made this right before all the folks from Daring Bakers posted their lemon meringue mini-tarts. It was a funny coincidence. I'd love to make this again soon. I'm going to try and get a blowtorch beforehand.

Nick & Stef's lemon meringue pie
adapted from The Los Angeles Times (latimes.com)
Total time: 1 hour, 25 minutes plus chilling time
Servings: 8 to 10
Note: Adapted from a Nick & Stef's recipe. The dough makes enough for two pies. Half of the dough can be frozen, tightly wrapped, for up to 6 months.

Sweet dough

1 cup (2 sticks) butter
3/4 cup plus 3 tablespoons sugar
1 egg yolk
1 whole egg
1/3 cup almond flour
3 1/4 cup flour
1/2 teaspoon baking powder

1. Cream the butter and sugar together in the bowl of a standing mixer fitted with a paddle attachment until it has a creamy consistency. Alternatively, cream the butter and sugar together in a large bowl using a hand mixer. With the mixer on, add the egg yolk until it is incorporated, then add the egg and incorporate completely.

2. In a separate bowl, sift together the almond flour, flour and baking powder. Add the dry ingredients to the mixing bowl slowly and continue mixing until the dough is thoroughly combined. The dough should be slightly sticky but not wet. If the dough is too dry and crumbly, add up to 1 tablespoon of water to moisten the dough.

3. Divide the dough into two equal portions. Shape each portion into a circle and cover tightly with plastic wrap. Refrigerate one of the portions, and allow it to rest for at least 1 hour. The remaining portion can be frozen for up to 6 months. (For frozen dough, thaw in the refrigerator before using.)

4. Heat the oven to 350 degrees. Remove the chilled dough from the refrigerator, and place on a lightly floured work surface. Roll out the dough into a circle slightly less than one-fourth-inch thick and about 12 inches in diameter. Gently drape the dough into a 9-inch pie pan, and trim off any excess dough so that the crust is flush with the sides of the pan. With a fork, prick holes all over the dough to allow steam to escape during baking. Bake until golden brown, 15 to 25 minutes. Allow to cool on a rack.

Lemon curd

4 eggs
2 egg yolks
1 cup sugar
Zest of 1 lemon
1 cup fresh lemon juice
2 gelatin sheets
1/2 cup butter (1 stick), cut into 1/2 -inch cubes
1 baked pie shell

1. In a large heat-proof mixing bowl (you should be able to set it over a large pan or stock pot of simmering water to form a bain-marie), whisk together the eggs, egg yolks, sugar and lemon zest. Whisk in the lemon juice.

2. Fill a small bowl with water, and insert the gelatin sheets to allow them to soften. Place the butter cubes into a medium bowl and set aside.

3. Place the bowl with the lemon curd over a larger pot of gently simmering water to form a bain-marie. Cook the curd, stirring gently but constantly, until the curd begins to thicken and will lie on top of itself. Watch carefully to make sure the heat is not so hot that the eggs scramble. Immediately remove the curd from the stove, and pour the curd into the bowl with the butter. Remove the gelatin sheets from the water, wringing out any extra moisture, and add to the curd mixture. Gently stir the curd with a spatula to melt and incorporate the butter and gelatin into the mixture.

4. Pour the lemon curd into the prebaked pie shell. Cover the surface of the curd with plastic wrap, and place in the refrigerator for at least a few hours, preferably overnight, until the curd is set.

Meringue and assembly

1 1/4 cup sugar
4 egg whites
1 lemon pie

1. Place the sugar in a medium saucepan. Add one-half cup water, and stir with the sugar until it is the consistency of wet sand. Place the saucepan over medium-high heat, and cook the sugar until a thermometer inserted reads 240 degrees. (The sugar will form a firm ball when a little is dropped into a bowl of cold water).

2. While the sugar is cooking, begin whipping the egg whites. Continue beating until the whites form stiff peaks, but be careful not to over-beat.

3. When the sugar is ready, immediately remove it from the heat, and pour it into a heat-proof measuring cup to stop the cooking process. With the mixer speed on low, carefully begin pouring in the sugar, watching that the sugar does not touch the wire beaters and splatter. Once all of the sugar is added, increase the mixer speed to medium, and continue beating until the meringue cools and is very fluffy.

4. Remove the chilled lemon pie from the refrigerator and remove the plastic wrap. Spoon the meringue on top of the curd with a rubber spatula, forming a dome on top of the pie. To toast the meringue (which is optional), use a small hand torch and lightly torch the meringue until it is golden brown. Serve immediately.

Sunday, March 30, 2008

Perfect Party Cake.

Perfect Party Cake

Perfect Party Cake

I recently joined The Daring Bakers, a group of bloggers who agree to bake a chosen recipe each month. This month, the challenge was Dorie Greenspan's Perfect Party Cake from Baking From my Home to Yours. Since i'd made the cake before, I decided to challenge myself with a flavor variation.

This cake lends itself to experimentation; the buttercream recipe is extremely forgiving and the cake layers are sturdy enough to slice and move easily. I flavored my cake layers with almond extract and orange zest and substituted the lemon juice in the buttercream for orange juice. I toasted some sliced almonds for the topping to keep with the orange/almond theme.

The complicated part of this cake was the filling. Instead of the listed buttercream/jam filling, I decided to substitute Sherry Yard's Creme Chiboust recipe from The Secrets of Baking. Creme Chiboust is a pastry cream that's usually lightened with whipped cream or beaten egg whites and gelatin.

I flavored my pastry cream with vanilla beans and orange zest. After incorporating the egg whites I built the cake in a setting ring lined with cake ribbon/transfer sheets. The unchilled filling is too loose to use without a ring. The filling made my cake unbelievably tall- it took the entire buttercream recipe just to frost the top and sides.

When I unmolded the cake to frost it, I was convinced it would fall apart or have big chunks of gelatin in it. I shouldn't have worried so much- it set perfectly and made frosting the outside easy. I think I this was the fastest, neatest frosting job i've ever done! I the cake for a small party and people enjoyed it. It tasted like a light, fluffy burnt almond torte.

Perfect Party Cake
adapted from Dorie Greenspan's Baking from my Home to Yours.

For the Cake
2 1/4 cups cake flour
1 tablespoon baking powder
½ teaspoon salt
1 ¼ cups whole milk or buttermilk (I prefer buttermilk with the lemon)
4 large egg whites
1 ½ cups sugar
2 teaspoons grated lemon zest
1 stick (8 tablespoons or 4 ounces) unsalted butter, at room temperature
½ teaspoon pure lemon extract

For the Buttercream
1 cup sugar
4 large egg whites
3 sticks (12 ounces) unsalted butter, at room temperature
¼ cup fresh lemon juice (from 2 large lemons)
1 teaspoon pure vanilla extract

For Finishing
2/3 cup seedless raspberry preserves stirred vigorously or warmed gently until spreadable
About 1 ½ cups sweetened shredded coconut

Getting Ready
Centre a rack in the oven and preheat the oven to 350 degrees F. Butter two 9 x 2 inch round cake pans and line the bottom of each pan with a round of buttered parchment or wax paper. Put the pans on a baking sheet.

To Make the Cake
Sift together the flour, baking powder and salt.
Whisk together the milk and egg whites in a medium bowl.
Put the sugar and lemon zest in a mixer bowl or another large bowl and rub them together with your fingers until the sugar is moist and fragrant.
Add the butter and working with the paddle or whisk attachment, or with a hand mixer, beat at medium speed for a full 3 minutes, until the butter and sugar are very light.
Beat in the extract, then add one third of the flour mixture, still beating on medium speed.
Beat in half of the milk-egg mixture, then beat in half of the remaining dry ingredients until incorporated.
Add the rest of the milk and eggs beating until the batter is homogeneous, then add the last of the dry ingredients.
Finally, give the batter a good 2- minute beating to ensure that it is thoroughly mixed and well aerated.
Divide the batter between the two pans and smooth the tops with a rubber spatula.
Bake for 30-35 minutes, or until the cakes are well risen and springy to the touch – a thin knife inserted into the centers should come out clean
Transfer the cakes to cooling racks and cool for about 5 minutes, then run a knife around the sides of the cakes, unfold them and peel off the paper liners.
Invert and cool to room temperature, right side up (the cooled cake layers can be wrapped airtight and stored at room temperature overnight or frozen for up to two months).

To Make the Buttercream
Put the sugar and egg whites in a mixer bowl or another large heatproof bowl, fit the bowl over a plan of simmering water and whisk constantly, keeping the mixture over the heat, until it feels hot to the touch, about 3 minutes.
The sugar should be dissolved, and the mixture will look like shiny marshmallow cream.
Remove the bowl from the heat.
Working with the whisk attachment or with a hand mixer, beat the meringue on medium speed until it is cool, about 5 minutes.
Switch to the paddle attachment if you have one, and add the butter a stick at a time, beating until smooth.
Once all the butter is in, beat in the buttercream on medium-high speed until it is thick and very smooth, 6-10 minutes.
During this time the buttercream may curdle or separate – just keep beating and it will come together again.
On medium speed, gradually beat in the lemon juice, waiting until each addition is absorbed before adding more, and then the vanilla.
You should have a shiny smooth, velvety, pristine white buttercream. Press a piece of plastic against the surface of the buttercream and set aside briefly.

To Assemble the Cake
Using a sharp serrated knife and a gentle sawing motion, slice each layer horizontally in half.
Put one layer cut side up on a cardboard cake round or a cake plate protected by strips of wax or parchment paper.
Spread it with one third of the preserves.
Cover the jam evenly with about one quarter of the buttercream.
Top with another layer, spread with preserves and buttercream and then do the same with a third layer (you’ll have used all the jam and have buttercream leftover).
Place the last layer cut side down on top of the cake and use the remaining buttercream to frost the sides and top.
Press the coconut into the frosting, patting it gently all over the sides and top.

Serving
The cake is ready to serve as soon as it is assembled, but I think it’s best to let it sit and set for a couple of hours in a cool room – not the refrigerator. Whether you wait or slice and enjoy it immediately, the cake should be served at room temperature; it loses all its subtlety when it’s cold. Depending on your audience you can serve the cake with just about anything from milk to sweet or bubbly wine.

Storing
The cake is best the day it is made, but you can refrigerate it, well covered, for up to two days. Bring it to room temperature before serving. If you want to freeze the cake, slide it into the freezer to set, then wrap it really well – it will keep for up to 2 months in the freezer; defrost it, still wrapped overnight in the refrigerator.

Playing Around
Since lemon is such a friendly flavour, feel free to make changes in the preserves: other red preserves – cherry or strawberry – look especially nice, but you can even use plum or blueberry jam.

Sunday, July 26, 2009

Lemon Chess Pie with Sour Cherries

Lemon Chess Pie with Sour Cherries

Since I bake so often, I usually have treats to give away. I made seven pies last week, and while some of them were for specific people, others were up for grabs. Deciding who to give them to was an interesting process.

I have an unspoken bartering system with people who loan me ingredients. An egg will get them a slice. Two pounds of peaches might get them half the pie, possibly the whole pie if i'm feeling really friendly. It usually depends on how badly I need the ingredient.

I also consider things like, "when was the last time I took a pie to work?" or "when did I last give a pie to [some person]?" Given too frequently, treats cease to be special. If you take a pie to work every day, people will start grumbling on the days you don't bring a pie. I like having a rotation of multiple workplaces and people.

If i'm really undecided, i'll mention my indecision on Facebook or in the company of friends. Whoever expresses the most interest in the pie usually gets the pie. Sometimes my morning commute factors in; if taking two pies to work requires getting them on the 71A during the morning rush, i'll probably pass. Many a pie has gone to a friend who lives nearby, or a friend with a car.

I sent half of this lemon pie to work with a friend, where it was promptly devoured. People came looking for it long after it was gone. I love hearing what happens to baked goods after I give them away. Sometimes I enjoy the stories about the food more than the food itself.

This is a versatile recipe. The original recipe in The Foster's Market Cookbook includes variations for Eggnog Pie and Chocolate Chess Pie. You can also substitute other fresh or dried fruits. I would suggest adding more than 1/2 cup- in this photo, i've used about 3/4 cup of cherries, and I think more would have been better.

Lemon Chess Pie with Sour Cherries
adapted from Sara Foster's The Foster's Market Cookbook

1 1/2 cups sugar
1 tbsp yellow cornmeal
1 tbsp all purpose flour
3 large eggs, lightly beaten
Grated zest and juice of 2 lemons
4 tbsp unsalted butter, melted and cooled
1/2 cup heavy cream
1 tsp pure vanilla extract
1/2 cup fresh sour cherries, pitted
OR 1/2 cup dried cherries, soaked in hot water for 1 hour and drained
1 unbaked 9-inch pie crust

1. Preheat the oven to 350F.

2. Combine the sugar, cornmeal, and flour in a bowl and stir until blended.

3. Add the eggs to the sugar mixture and whisk until smooth and well blended.

4. Add the lemon zest, lemon juice, butter, cream, and vanilla, and mix until well blended.

5. Place the cherries in the bottom of the chilled, unbaked pie crust.

6. Pour the filling on tom of the cherries. Bake 50-55 minutes, or until the top is golden brown and a toothpick inserted in the center comes out clean.

7.Cool the pie completely on a baking rack before slicing.

Tuesday, November 4, 2008

Cinnamon Buns

Cinnamon Rolls

Cinnamon Rolls

I'm still working on a post about my trip. For now, I thought i'd share some of the baking I did beforehand.

I'd been meaning to try this recipe for a while, and i'm really pleased I did. Most of the cinnamon bun recipes i've tried yield rich, danish-like pastries as opposed to fluffy, bread-like ones. The relatively low fat content of the dough makes these buns ideal for topping with sugary glaze or creamy frosting.

I used whole milk, all purpose flour, and lemon extract for the dough. I think bread flour would have been better, and i'm eager to try the buttermilk variation. I encourage you to be very cautious with the lemon extract. The Nielsen-Massey brand is incredibly potent, and I wish i'd cut the amount in half. Most of my friends liked the lemon flavor, but I think I would have preferred vanilla.

I haven't included the fondant glaze from the original recipe; it was a pretty standard combination of confectioners' sugar, warm milk, and lemon extract. Instead, i've added a cream cheese frosting recipe from another blog. These buns are texturally similar to the ones sold at Dozen Bakeshop in Lawrenceville, so if you're a fan i'd try out the recipe.

There's nothing quite like biting into a huge, freshly-baked cinnamon roll. I spent a leisurely afternoon proofing, shaping, and baking the dough, and then end product was incredibly satisfying.

Cinnamon Buns
From Peter Reinhart’s The Bread Baker’s Apprentice
Makes 8-12 large or 12-16 smaller buns

6 1/2 tablespoons (3.25 ounces) granulated sugar
1 teaspoon salt
5 1/2 tablespoons (2.75 ounces) shortening or unsalted butter, room temperature
1 large egg, slightly beaten
1 teaspoon lemon extract or zest
3 1/2 cups (16 ounces) unbleached bread or all-purpose flour
2 teaspoons (.22 ounce) instant yeast
1 1/8 to 1 1/4 cups (9 to 10 ounces) whole milk or buttermilk, room temperature
1/2 cup (4 ounces) cinnamon sugar (6 1/2 tablespoon granulated sugar plus 1 1/2 tablespoons cinnamon

1. Cream together the sugar, salt, and shortening on medium-high speed in an electric mixer with a paddle attachment. Whip in the egg and lemon extract until smooth. Then add the flour, yeast, and milk. Mix on low speed until the dough forms a ball. Switch to the dough hook and increase the speed to medium, mixing for approximately 10 minutes, or until the dough is silky and supple, tacky but not sticky. Lightly oil a large bowl and transfer the dough to the bowl, rolling it around to cover it with oil. Cover bowl with plastic wrap.

2. Ferment at room temperature for approximately 2 hours, or until the dough doubles in size.

3. Mist the counter with spray oil and transfer the dough to the counter. Roll out the dough with a rolling pin, lightly dusting the top of the dough with flour. Roll it into a rectangle about 2/3 inch thick and 14 inches wide by 12 inches long for larger buns, or 18 inches wide by 9 inches long for smaller buns. Sprinkle the cinnamon sugar over the surface of the dough and roll the dough up into a cigar-shaped log, creating a spiral as you roll. With the seam side down, cut the dough into 8 to 12 even pieces, each about 1 3/4 inches thick for larger buns; or 12 to 16 pieces each 1 1/4 inch thick for smaller buns.

4. Line 1 or more sheet pans with baking parchment. Place the buns approximately 1/2 inch apart so that they aren’t touching but are close to one another.

5. Proof at room temperature for 75 to 90 minutes, or until the pieces have grown into one another and have nearly doubled in size. You may also retard the shaped buns in the refrigerator for up to 2 days, pulling the pans out of the refrigerator 3 to 4 hours before baking to allow the dough to proof.

6. Preheat the oven to 350 degrees F with the oven rack on the middle shelf.

7. Bake the buns for 20 to 30 minutes, or until golden brown.

8. Cool the buns in the pan for about 10 minutes and then glaze the tops. Remove the buns from the pans and place them on a cooling rack. Wait at least 20 minutes before serving.

Cinnamon Bun Glaze
From Molly Wizenberg, Bon Appétit, March 2008

4 ounces cream cheese, room temperature
1 cup powdered sugar
1/4 cup (1/2 stick) unsalted butter, room temperature
1/2 teaspoon vanilla extract

Combine cream cheese, powdered sugar, butter, and vanilla in medium bowl. Using electric mixer, beat until smooth. Spread glaze on rolls. Serve warm or at room temperature.

Tuesday, August 19, 2008

Banana Cake and Lemon Almond Torta

Lemon Almond Torta and Banana Cake

Banana Cake w/ Cream Cheese Frosting

One of the best parts of making this Banana Cake from last week's LA Times was eating the cake scraps. The recipe comes from Clementine, a bakery/cafe in Century City. Mom and I had lunch there today. I love their sandwiches and deli salads, but their baked goods can be hit or miss.

My family sets the bar pretty high for pastries. This week I made:
  • Strawberry tarts with vanilla pastry cream
  • White nectarines with toasted almonds and custard
  • Almond biscotti
  • Glazed buttermilk cookies
  • Almond and nectarine cakes
  • Banana bread (twice)
  • Banana cake with cream cheese frosting
  • Almond crescents with burnt butter icing
  • Crepes with peaches and blueberry sauce
  • Lemon almond torta

    I love spoiling my family. It's so much more fun to bake when you have a house full of people to feed.

    The Lemon Almond Torta is a recipe from The Traveler's Lunchbox. The lemon curd topping is quite good- next time i'd spread it more evenly though. My large dollops made the cake lumpy.
  • Monday, June 9, 2008

    Buttermilk Cookies

    Buttermilk Cookies

    Buttermilk Cookies

    I love breakfast. Most days I eat oatmeal, but lately i've channeled my misplaced culinary energy into different breakfast options: whole wheat buttermilk pancakes, cheese omelets with sriracha, yogurt with white peaches and granola, toasted local breads with coffee, and several crepe recipes with jam.

    What do these cookies have to do with breakfast? Very little. At the moment, any baking I do is motivated by the contents of my refrigerator. I had some leftover buttermilk and butter, so I plugged "buttermilk cookies" into epicurious and found this recipe.

    I didn't care for the buttermilk cookies from America's Best Lost Recipes. These were better- moist and cakey with slightly crunchy edges. They're somewhat like Italian love knots, but less crumbly. I like them with tea.

    I added a few drops of lemon extract in lieu of lemon zest. I would have preferred a more pronounced lemon flavor, so next time I may use zest and a lemon glaze.

    Buttermilk Cookies
    from Gourmet

    3 cups all-purpose flour
    1 teaspoon grated lemon zest
    1/2 teaspoon baking soda
    1/2 teaspoon salt
    1 1/2 sticks unsalted butter, softened
    1 1/2 cups granulated sugar
    2 large eggs
    1 teaspoon pure vanilla extract
    2/3 cup well-shaken buttermilk
    For glaze
    1 1/2 cups confectioners sugar
    3 tablespoons well-shaken buttermilk
    1/2 teaspoon pure vanilla extract

    Make cookies:
    Preheat oven to 350°F with rack in middle. Butter 2 large baking sheets.
    Whisk together flour, zest, baking soda, and salt.
    Beat together butter and sugar in a large bowl with an electric mixer until pale and fluffy.
    Add eggs 1 at a time, beating well after each addition, then beat in vanilla.
    Mix in flour mixture and buttermilk alternately in batches at low speed, beginning and ending with flour mixture, until smooth.
    Drop level tablespoons of dough about 1 1/2 inches apart onto baking sheets. Bake, 1 sheet at a time, until cookies are puffed and edges are golden, 12 to 15 minutes per batch. Cool cookies on sheets 1 minute, then transfer cookies to racks.

    Glaze cookies:
    Whisk together all glaze ingredients and brush onto tops of warm cookies.
    Let stand until cookies are completely cooled and glaze is set.
    Cookies are best the day they're made but can be frozen, wrapped well, up to 1 month.

    Monday, June 4, 2007

    Melting Moments

    Melting Moments

    Melting Moments

    I'd never heard of Melting Moments until recently. They remind me a little of rosketti- a simple chamorro corn starch cookie that melts in your mouth. Mexican wedding cookies also have that similar crumbly, sandy texture.

    These are from Donna Hay's Modern Classics 2. The best part is they're incredibly simple and fast to prepare. They're filled with a simple lemon frosting.

    Melting Moments
    adapted from Donna Hay
    175g (about a stick and a half) butter, softened
    1/4 cup powdered sugar
    1 tsp vanilla
    1 cup all purpose flour, sifted
    1/4 cup corn starch, sifted
    60g butter (about half a stick), softened
    2 tsp lemon juice
    2 tsp lemon zest
    1 cup powdered sugar

    Preheat oven to 350.
    Cream the butter, sugar, and vanilla until smooth.
    Add the flour and cornstarch and mix until it comes together.
    Put the batter in a bag and with a fluted tip and pipe 1" circles onto parchment lined baking sheets.
    Bake 12-14 minutes until golden brown.

    For the frosting, cream the butter, sugar, lemon juice and zest.
    When the cookies are cool, sandwich them together with some frosting.
    Makes about 16 sandwiches.

    Saturday, October 27, 2007

    Scones from Enrico Biscotti Co.

    Scones from Enricos

    During undergrad I took a 7:56am bus to the Strip District almost every Saturday. Now I avoid Saturday because it gets so crowded! Still, I love the Strip and I go there for different things depending on my mood and the time of year.

    Right now i'm in a scone phase. While I like traditional, soft cream scones with jam or clotted cream, I'm rather partial to drop scones. These ones have particularly crusty exteriors (and i'm a sucker for anything crusty.)

    I think my current favorite flavor is raspberry with lemon icing. Today I decided on lemon and chocolate chip/pecan. They were perfect with coffee. In general I love the combination of chocolate/lemon and coffee/lemon.

    Scones from Enricos

    The Enrico Biscotti Company is one of my favorite places. You can always find good, comforting food there, and Larry Lagatutta has great stories about old italian ladies, handed-down recipes, and knife injuries. Their cafe is now open six days a week, so you can get your wood-fired-pizza fix.

    Now if only the yearly supply of Bahlsen christmas cookies would arrive. Then it would really feel like fall.

    Sunday, June 28, 2009

    Lemon-Blueberry Cake

    Lemon Blueberry Cake

    Blueberries are on sale everywhere, it seems.

    This cake was a variation on the Perfect Party Cake from Dorie Greenspan's Baking From my Home to Yours. I added blueberries and a tart lemon curd from The America's Test Kitchen Family Baking Book.

    Summer isn't an ideal season for transporting layer cakes. It was about 90 degrees in the car and the piping details started to melt. Luckily, the cake arrived at its final destination in one piece.

    My favorite part of this recipe was the lemon curd. I've been pleased with the America's Test Kitchen Family Baking Book. It has a good balance of sweet and savory recipes for different skill-levels, and I think it would make an excellent gift for the novice baker.

    Saturday, November 24, 2007

    Green Tea Kasutera

    Green Tea Kasutera

    I remember the first time I saw someone eat cake and milk; my uncle Bob piled four or five slices of leftover lemon cake in a bowl, drenched them in milk and proceeded to eat them as though they were breakfast cereal. I thought it seemed ridiculously decadent and I suspected my parents wouldn't really approve. Soon, one of my childhood comforts was eating cake and milk and watching tv whenever my parents left the house.

    It's not nearly as exciting anymore, but I still enjoy it on occasion. Especially with this green tea sponge cake. The honey in the cake pairs nicely with milk. I don't have a tube pan; I usually just make it in a 10 or 12 inch cake pan.

    Green Tea Kasutera
    reposted from dianasdesserts.com

    Ingredients:
    1 cup plus 1 tablespoon granulated sugar
    1/4 cup honey
    1 teaspoon vanilla extract
    1 teaspoon lemon extract
    1/4 teaspoon salt
    7 large eggs, separated
    1 cup cake flour, sifted
    1/8 teaspoon cream of tartar
    1 tablespoon green tea powder or unsweetened cocoa powder (optional-if using omit the lemon extract)
    Instructions:
    1. Preheat oven to 325 degrees F (160 C). Use parchment to line the bottom of a 10-inch tube pan, preferably with a removable bottom or 2 (8 x 4-inch) loaf pans. Grease the parchment. In a large bowl, whisk 1 cup sugar, honey, vanilla, lemon extract, and salt into egg yolks. Place bowl in a large pan of hot water. With an electric mixer, beat about 5 minutes on medium-high speed until pale yellow and doubled in volume. Gently fold in sifted flour.

    2. Wash beaters. In a large bowl, beat egg whites in electric mixer on a low speed 1 minute, increasing speed to medium-high. When foamy, sprinkle in 1 tablespoon sugar and cream of tartar. Beat until stiff but not dry. With a spatula, fold the egg whites in thirds. Pour batter into pan. Tap gently on the counter to remove air bubbles.

    3. Bake on middle rack of oven 35 to 45 minutes or until golden brown. When done, cake sides will pull away from pan slightly; top will be flat and feel spongy when pressed with finger. Cool 20 minutes. Run a small knife between edge of cake and pan. Remove from pan carefully. Pull off parchment and cool completey. Serve or store airtight.

    NOTE:
    This recipe is adapted from the Kastutera recipe in "Japanese Cooking for the American Table" by Susan Fuller Slack.

    Thursday, March 6, 2008

    Green Tea Pudding Cakes

    Green Tea Pudding Cake

    Green Tea Pudding Cake

    I'm always on the lookout for good green tea recipes. This one is probably more palatable to your average person than these green tea puddings. If you know a spectacular green tea recipe, please let me know.

    Please follow the chilling instructions. Unchilled, these puddings have a strange texture and eggy flavor. They were a little plain; next time, i'd top them with whipped cream mixed with muddled raspberries or diced mango, kiwi, or strawberries.

    Green Tea Pudding Cakes
    from teality.com

    2 ounces (1/4 cup) unsalted butter, melted and cooled slightly
    1 cup granulated sugar
    3 large eggs, room temperature
    1 1/8 ounce (1/4 cup) unbleached all purpose flour
    3 teaspoons Matcha
    1/4 plus 1/8 teaspoon salt
    1 1/8 cup whole milk, room temperature
    1/4 cup fresh Meyer lemon juice, room temperature
    1/2 tablespoon finely grated lemon zest
    whipped cream (optional)

    Position rack in the center of the oven and preheat at 350 degrees. Butter eight 6 oz ovenproof ramekins and arrange them in a baking dish or a roasting pan.

    In a large bowl, whisk the melted butter with 2/3 cup of sugar and the egg yolks until smooth and turns a light yellow color, about 1 minute. Add the flour and salt and pour in just enough milk to whisk the flour smoothly into the egg yolk mixture. Next, whisk in the remaining milk and the lemon juice until smooth. The mixture will be very fluid. Slowly sift the matcha into the mixture and mix making sure that the matcha doesn't clump up.

    Put the egg whites in a large bowl. Beat with an electric mixer with a whisk attachment on medium speed until the whites begin to foam, 30 to 60 seconds. Increase the speed to high and beat until the whites hold a soft peak, another 1 to 2 minutes. Reduce the speed to medium and with the mixer running slowly sprinkle in the remaining 1/3 cup of sugar. Stop the mixer and scrap down the sides of the bowl. Beat on high speed until the whites hold a medium firm peak, about 30 seconds. Scrape 1/3 of the egg whites into the egg yolk mixture, sprinkle the lemon zest on top and whisk until combined. Gently incorporate the remaining egg whites into the batter using the whisk in a folding/stirring motion. The batter will still be a little thin.

    Portion the mixture evenly into the ramekins. The cakes do not rise much so you can fill the ramekins to within 1/8 inch of the top. Pull out the oven rack and put the baking dish full of ramekins on the rack. Pour warm water into the dish until it reaches half way up the side of the ramekins. Bake until the tops of the cake are light golden brown and slightly puffed, and when touched with a finger, they should feel spongy and spring right back a bit but hold a shallow indentation. 30 to 35 minutes.

    Using tongs, carefully transfer the ramekins to a rack to cool to room temperature and then refrigerate for at least 4 hours and up to 24 hours before serving. Add whipped cream and enjoy!

    Friday, March 7, 2008

    Lemony Semolina Cookies

    Lemony Semolina Cookies

    Lemony Semolina Cookies

    I called my mother to tell her about these cookies. "They have lemon juice and zest and limoncello in them," I said. "They're kindof like tea cakes-soft, good with coffee."

    "They sound like the kind of cookies you pack in a box and ship to your mother,"
    she said.

    My roommates loved them. I took them to a Lost watching party and everyone there loved them. Liz leaned over to her fiance Brian and whispered a comment about how good they were, which he relayed to everyone else. They're definitely some of the best cookies i've had in a while.

    I wasn't sure if i'd like the semolina; I made some semolina waffles once and they tasted like pasta. In this context, the semolina is like cornmeal, but less crunchy. It gives the cookies a lovely color and crumbly texture.

    I've seen some photos where the cookies spread very flat, so I tried to keep the liquid and sugar measurements very precise. I used a small lemon too. Chill the dough thoroughly and keep the cookies small.

    These cookies keep well and would ship quite nicely. They're dainty and sophisticated. Put them in a box and send them to your mother.

    Lemony Semolina Cookies
    adapted from Dolce Italiano by Gina De Palma
    Makes 5 dozen cookies

    2 cups all purpose flour
    2/3 cup semolina
    1 teaspoon baking powder
    1/2 teaspoon baking soda
    1/2 teaspoon kosher salt
    1/2 cup (1 stick) unsalted butter
    2 tablespoons extra-virgin olive oil
    1 cup granulated sugar, plus extra for rolling
    1 large egg
    1 large egg yolk
    freshly grated zest and juice of one lemon
    2 tablespoons limonccello
    1/2 teaspoon vanilla extract

    Whisk flour, semolina, baking powder, baking soda and salt together in a bowl.

    Using an electric mixer fitted with the paddle attachment, cream together the butter, oil and sugar on medium speed until light and fluffy. Beat in the egg and egg yolk, scraping down the sides of the bowl. Continue to add the lemon zest, juice, limoncello and vanilla, making sure to srape the sides of the bowl down.

    Using low speed beat in the dry ingredients until a very soft dough is formed. Scrape out onto a sheet of plastic wrap, flatten into a disc, wrap and chill for an hour.

    Preheat the oven to 325F. Lightly grease two baking sheets, line with baking parchment or a silpat.

    Break off teaspoon-sized bits of dough and roll them into balls about an inch in diameter. Roll each in a small bowl of sugar and place on the tray. Make sure to space them an inch apart as they'll spread.

    Bake for 14-15 minutes until they've flattened out and are crinkly on top. Cool on the sheet for 2 minute and then use a spatula to transfer to a wire rack.

    Thursday, February 14, 2008

    Banana Chocolate Chip Cake

    Banana Chocolate Chip Cake

    Banana Chocolate Chip Cake

    I'm surprised that i'm not sick of banana desserts by now. This is the sixth banana recipe i've made since January. I have a habit of comparing banana bread/cake/muffin recipes. The little variations spark my curiosity.

    This recipe has a higher proportion of fat than the others. A good dose of butter and sour cream makes the crumb very delicate and soft. It's more like a decadent pound cake than a traditional banana bread. Try to get the banana extract if you can; I thought my cake could have used more banana flavor. The mace is a nice peppery, nutmeg-like touch.

    The directions might seem a little complicated or over the top. The details are related to texture. Pureeing and straining the bananas removes the seeds and improves their texture. Cake flour, sour cream, and superfine sugar improve the cake's tenderness and crumb. Creaming the butter and sugar and gently folding in the ingredients ensures a light, fluffy cake rather than a dense, tough one.

    I cut up most of this cake and took it to work. It was definitely interesting and well enjoyed, but i'm not sure i'll make it again soon.

    Banana Chocolate Chip Cake
    adapted from Carole Walter's Great Coffee Cakes, Sticky Buns, Muffins & More

    2 1/2 cups sifted cake flour, spooned in and leveled
    1 tsp baking soda
    1/2 tsp salt
    1/2 tsp mace
    2 large, very ripe bananas
    1 tsp lemon juice
    3/4 cup sour cream
    1 tsp pure vanilla extract
    3/4 tsp banana extract
    3/4 cup unsalted butter (1.5 sticks) slightly firm
    1 1/4 cups superfine sugar
    3 large eggs
    1/2 cup mini chocolate chips
    1 large recipe vanilla glaze

    1. Position the rack in the lower third of the oven. Heat the oven to 350F. Generously butter a 10 inch bundt pan, dust with flour, then invert it over the kitchen sink and tap firmly to remove the excess flour. Set aside.

    2. In a large bowl, thoroughly whisk the flour, baking soda, salt, and mase. Set aside.

    3. Cut the bananas into 1 inch pieces and place with the lemon juice in the bowl of a food processor fitted with the steel blade. Process for 30 seconds, then stop the machine and scrape down the sides of the bowl. Process for another 10 seconds, or until the bananas are pureed. Strain the puree through a medium-gauge strainer. You should have a generous cupful. Stir the sour cream and extracts into the bananas and set aside.

    4. Cut the butter into 1 inch pieces and place in the bowl of an electric mixer fitted with the paddle attachment. Mix on medium speed until smooth and lightened in color, about 2 minutes. Add the sugar, 1 to 2 tablespoons at a time, taking 6 to 8 minutes. Blend in the eggs, one at a time, beating thoroughly after each addition, scraping down the side of the bowl as needed.

    5. Reduce the mixer speed to low and add the dry ingredients alternately with the banana/sour cream mixture, dividing the flour mixture into four parts and the liquid into three parts, beginning and ending with the flour. Scrape down the side of the bowl, then mix for 10-15 seconds longer. Remove the bowl from the machine and, using a large rubber spatula, fold in the mini chocolate chips.

    6. Spoon the batter into the prepared pan. Smooth the surface with the back of a large soupspoon and bake for 55-60 minutes. The cake is done when the top is golden brown and firm to the touch, and a wooden skewer inserted deeply in the center comes out clean.

    7. Remove the cake from the oven and let stand on a cooling rack for 10 minutes. Invert the pan onto the rack and carefully lift it off. As the cake is cooling, prepare the vanilla glaze. While the cake is still warm, place a piece of parchment or wax paper under the rack and spoon the glaze onto the cake. The glaze will harden as the cake cools. Store under a cake dome or tightly covered with aluminum foil for up to 7 days. This cake may be frozen before glazing. You can also omit the chocolate chips and fold in 1/2 to 3/4 cup medium-chopped walnuts or pecans.

    Vanilla Glaze
    1 cup strained powdered sugar
    3 to 4 tbsp hot water, milk, or cream
    2 tsp light corn syrup
    1/4 tsp pure vanilla extract
    1/8 tsp lemon juice
    2 pinches salt

    Place the powdered sugar in a medium bowl. Add 3 tsp of the hot water or milk, the corn syrup, vanilla, lemon juice, and salt. Stir until smooth. Add additional liquid as needed to make a thin glaze. Use immediately if possible, or rewarm by setting the bowl in a bowl of hot water.

    Tuesday, February 20, 2007

    Kataifi with Cream Filling

    Kataifi with Cream Filling

    Kataifi with Cream Filling

    This is a Lebanese dessert from Claudia Roden's Arabesque. It's an intriguing cookbook with gorgeous photos and interesting Lebanese, Turkish, and Moroccan recipes.

    This particular recipe was slightly difficult to interpret. It's essentially a milk/cream pastry cream thickened with rice flour sandwiched between generous amounts of buttered kataifi (shredded filo dough.)

    The recipe doesn't tell you how exactly to add the rice flour paste, and if you just throw it into the cream it will curdle into dougy chunks. I solved this problem by whisking small amounts of the hot milk into the flour until it was liquidy enough to add to the rest.

    Afterwards, you coat the pastry with a generous amount of sugar syrup cooked with lemon juice and orange blossom water. Occasionally, I think orage blossom water makes desserts taste like soap. I was very pleasantly surprised when this pastry tasted delicate and not overly sweet!

    The taxi cab just happened to be outside my window. I thought it was fun.

    Kataifi with Cream Filling
    For the syrup
    2 1/2 cups sugar
    1 1/4 cups water
    1 tbsp lemon juice
    2 tablespoons orange blossom water

    For the cream filling
    1/2 cup rice flour
    4 cups whole milk
    1/2 cup heavy cream
    4 tbsp sugar

    For the pastry
    1 pound kataifi pastry, defrosted
    2 sticks of 1/2 pound unsalted butter, melted
    To garnish, 2/3 cupped chopped pistachios

    Make the syrup first. Boil the sugar with the water and lemon juice over low heat for 5-8 minutes, until it is just thick enough to coat the back of a spoon. Stir in the orange blossom water and cook a moment more. Let it cool and then chill in the refrigerator. (If you have overcooked the syrup and it becomes too thick to pour, you can rescue it by adding a little water and bringing it to a boil again.)

    For the filling, mix the rice flour with enough of the cold milk to make a smooth, creamy paste. Bring the rest of the milk with the cream to a boil, preferably in a nonstick pan. **Add rice flour paste, stirring vigorously with a wooden spoon. Leave it on low heat and continue to stir for 15-20 minutes, until the mixture is quite thick, being careful not to scrape any burned bits from the bottom of the pan. Add the remaining sugar and stir well.

    Put the pastry in a large bowl. With your fingers, pull out and separate the strands as much as possible. Melt the butter and when it has cooled slightly, pour it over the pastry. Press down firmly and flatten it with the palm of your hand. Bake in an oven preheated to 350 degrees for about 45 minutes.

    Just before serving, run a sharp knife around the edges to loosen the sides, and turn it out onto a large serving dish. Pour the cold syrup all over the hot pastry and top lavishly with pistachios. Alternatively, you can pour only half the syrup over the pastry and pass the rest in a jug for everyone to help themselves to more. (I used half.)

    ** this is the part where you can curdle the flour mixture. I recommend adding hot milk to it seperately, whisking, and then pouring it back into the pot.

    Tuesday, July 21, 2009

    Sour Cherry Pie

    Sour Cherry Pie

    The produce store on Murray Avenue had sour cherries for $5 per quart. I bought two and used most of them to make this sour cherry pie from Ken Haedrich's book.

    It's the first time i've seen sour cherries in Pittsburgh. I hear you have to order them; I know April from Cookworm ordered a flat from Patty's in Aspinwall. If anyone knows other places to source them, let me know!

    I thought making a lattice would be complicated, but it wasn't. The book's clear directions and illustrations made the process simple and fun. I've tried four recipes from this book this week and i've liked them all. Right now I have a strawberry rhubarb pie in the oven- i'll let you know how it turns out.

    Lattice-Top Deep-Dish Sour Cherry Pie
    adapted from Ken Haedrich's Pie

    1 recipe Flaky Pie Pastry

    Filling:
    6 cups fresh sour cherries, stemmed and pitted
    1 1/4 cups + 3 tbsp sugar
    1/4 cup cornstarch
    2 tsp fresh lemon juice
    Grated zest of 1 lemon
    2 tbsp cold unsalted butter, cut into small pieces

    Glaze:
    Milk or light cream
    Sugar

    1. Roll the disk of pastry into a 13.5 inch circle between two sheets of wax paper. Peel off the top sheet of paper. Invert the pastry over a 9.5 inch deep-dish pie pan, center, and peel off the paper. Gently tuck the pastry into the pan without stretching it. Sculpt the overhang into an upstanding ridge. Refrigerate for 15 minutes.

    2. Place the cherries in a large bowl. Mix sugar and cornstarch together in a small bowl, then stir the mixture into the fruit. Add the lemon juice and zest. Set aside for 10 minutes. Preheat the oven to 400F.

    3. On another sheet of wax paper, roll the remaining pastry into a 12x10 inch rectangle. Cut the pastry into 8 lengthwise strips, each 1.25 inches wide. You should have at least 8. Set aside.

    4. Turn the filling into the chilled pie shell. Smooth the top of the filling and dot it with the butter. Lay 5 pastry strips vertically across the pie, evenly spaced. Fold back strips 2 and 4 and lay another strip directly across the center of the pie. Unfold the folded strips, then fold back strips 1, 3, and 5. Lay another perpendicular strip across the pie. Unfold the folded strips, then fold up strips 1, 3, and 5 on the other side of the pie. Place another perpendicular strip across the pie, then unfold strips 1, 3, and 5. Trim the strips, then pinch the ends of the strips into the edge of the pastry. Lightly brush the strips with milk and sprinkle the top of the pie with sugar.

    5. Bake for 30 minutes. Reduce the oven temperature to 375F and rotate the pie 180 degrees. Just in case, slide a large baking sheet onto the rack below to catch any spills. Bake until the top is golden brown and any visible juices bubble thickly, 35-40 minutes.

    6. Transfer the pie to a wire rack and let cool for at least 2 hours before serving.

    Sunday, December 16, 2007

    Cornmeal Currant Biscotti

    Cornmeal Currant Biscotti

    Cornmeal Currant Biscotti

    I don't make biscotti much. Mediterra makes fabulous hazelnut and chocolate biscotti that are more like sables/butter cookies than traditional biscotti. I need to try a few more recipes before I know how to get the texture i'm looking for. This Alice Medrich recipe was pretty simple. I'm not sure i'd use currants next time; I think a slightly sweeter fruit would have been better with the cornmeal.

    The graduation party went well last night. All of the baked goods were devoured, excepting one poundcake which i'm taking home for my parents. I have plenty of photos to share later: more gingersnaps, blondies, glazed lemon cake, and more!

    Cornmeal and Fruit Biscotti
    adapted from Alice Medrich's Cookies and Brownies
    1 cup all-purpose flour
    1 cup cornmeal
    1/2 tsp baking powder
    1/4 tsp salt
    4 tbsp unsalted butter, softened
    1 cup sugar
    2 large eggs
    1 tsp vanilla extract
    1 tsp finely grated lemon zest
    1 cup raisins or dried cherries, cranberries, or blueberries, or chopped dried apricots

    Preheat oven to 350. Position a rack in the middle of the oven.

    Combine the flour, cornmeal, baking powder, and salt in a medium bowl and mix together thoroughly with a whisk or fork. Set aside.

    Beat the butter and sugar in a large bowl with an electric mixer until blended. Add the eggs, vanilla, and lemon zest, and beat until light and fluffy.

    Add the flour mixture, stirring until all of the ingredients are moistened. Add the raisins, mixing with your hands if necessary. Shape the dough into a 12x2 inch log and place it on a cookie sheet.

    Bake for 35-40 minutes, or until lightly browned and cracked on top. Cool for 5-10 minutes. Transfer the loaf carefully to a cutting board. Using a long serrated knife, cut the loaf on the diagonal into slices about 3/8 inch wide. Lay the slices, cut side down, on the cookie sheet. Bake for 10 minutes, or until the cookies are barely beginning to brown at the edges. Set the pan on a rack. Cool the cookies completely before stacking or storing. May be stored, airtight, for at least 2 weeks.

    Saturday, January 24, 2009

    Buckwheat Crepes with Apples and Gruyere

    Buckwheat Crepes with Apples and Gruyere

    Buckwheat Crepes with Apples and Gruyere

    I found this recipe in the dessert section of Leite's Culinaria. I think it's better suited to breakfast or brunch, but that's negotiable. I love apples in savory contexts like slaws, vegetable mashes, and chutneys. Here, they're combined with Spanish onions, smoked ham, and Gruyere cheese, with a touch of nutmeg and lemon.

    Both the crepes and filling can be made ahead of time and refrigerated until needed. It's a great recipe if you're cooking for one or two, or if you want a fancy snack on hand. I loved that the simple components turned into something so sophisticated and subtle.

    The filling is quick to assemble and can be made in smaller quantities if needed. It's also quite adaptable: you can use bacon instead of ham, or omit the meat for a less savory variation. I'd love to try adding some thyme or another fresh herb.

    I have a few notes: Initially, my batter was too thick and yielded dense, rubbery crepes. I had to add about 1/2 cup more water to get the right consistency. I worried the crepes would be too thick or too plain, but they were well suited to the filling.

    Be sure to cook the filling in a large skillet- an 11-inch fry pan comfortably held the half batch in a single layer. A full batch probably won't fit in anything smaller. Also, when filling the crepes, make sure to fold the crepe up before it becomes too brittle. The longer it cooks, the less flexible it will be.

    I didn't bother buttering the skillet before cooking each crepe, or brushing the finished crepes with melted butter. They seemed fine as-is, and I enjoyed them thoroughly.

    Buckwheat Crepes with Apples and Gruyere
    adapted from Marie Simmons's Things Cooks Love

    Crepe batter:
    1 cup buckwheat flour
    1/2 cup all-purpose flour
    1 teaspoon coarse salt
    2 large eggs
    1 1/2 cups water
    2 tablespoons salted or unsalted butter, melted

    Filling:
    4 tablespoons salted or unsalted butter
    3 yellow onions, cut into 1/8-inch wedges
    6 slightly green Golden Delicious apples, quartered, cored, and cut crosswise into 1/8-inch
    wedges
    2 ounces smoked ham, thinly slivered (optional)
    3 tablespoons freshly squeezed lemon juice
    1/8 teaspoon freshly grated nutmeg
    Pinch of coarse salt

    1 tablespoon salted or unsalted butter, melted, plus 2 tablespoons, softened
    3 cups (12 ounces) coarsely grated Gruyère or Comté cheese

    Directions:
    Make the crepe batter
    1. In a large bowl, stir together the buckwheat flour, all-purpose flour, and salt. In a
    small bowl, whisk the eggs until well blended; stir in the water and butter.

    2. Gradually whisk the egg mixture into the flour mixture until the batter is smooth.
    Cover and refrigerate for 1 hour. The batter should be the consistency of heavy
    cream. If it is too thick, whisk in additional water, 1 tablespoon at a time.

    Make the filling
    1. While the batter is resting, make the filling. In a large skillet, melt the butter
    over medium-low heat. Add the onions; increase the heat to medium, and cook,
    stirring, for 5 minutes. Add the apples and cook, stirring, for 10 to 15 minutes, until
    the apples begin to brown and have softened. Add the ham and sprinkle with the
    lemon juice, nutmeg, and salt. Cover and set aside until ready to fill the crepes.

    Make and assemble the crepes
    1. Heat a 9- to 11-inch crepe pan over medium-low heat until hot enough for a drop
    of water to sizzle on contact. Brush the surface of the crepe pan with a thin film of
    the melted butter. Blot any excess with the tip of a paper towel. Stir the crepe batter
    well with the whisk.

    2. Ladle about 1/3 cup of the batter into the heated pan, and simultaneously tilt and
    roll the pan from side to side to coat the surface with a thin layer of batter. Cook for
    1 minute, or until the edges begin to set. Run the tip of a small narrow rubber
    spatula under the edges of the crepe to loosen it from the pan. Use your fingertips to
    lift the crepe and quickly flip it over. Cook the other side for 30 seconds, or until the
    batter is set into a thin pancake. Do not brown the crepe or cook it until crisp.
    Transfer the crepe to a large, round plate. Repeat with the remaining batter,
    brushing the pan with more butter if necessary. Stack the crepes as they are made.
    You should have 12 crepes. If making ahead, wrap the crepes in plastic wrap or
    aluminum foil to prevent drying out. The crepes can be refrigerated for up to 2 days.

    3. If the crepes have been made ahead, first fill them one at a time by warming each
    crepe in the pan over low heat. Otherwise, when the fresh crepe is cooked and still in
    the pan, sprinkle about 1/4 cup of the cheese in the center. Top the cheese with a
    large spoonful of the warm apple filling, spreading it into a single layer. Fold in two
    opposite sides of the circle to cover the filling. Then fold in the remaining two
    rounded sides, overlapping slightly, to form a square envelope. With a wide spatula,
    lift the crepe from the pan and invert it, so it is seam side down, onto a serving
    plate. Cover with aluminum foil to keep warm if not serving at once. Fill the
    remaining crepes in the same way. Reserve the remaining filling.

    4. Just before serving, brush the smooth top of each crepe with a thin film of the
    softened butter. Reheat the remaining apple filling and spoon a portion on top of
    each crepe. Serve at once.

    Wednesday, September 10, 2008

    Cocoa Nib and Hazelnut Florentines

    florentines_8099

    Cocoa Nib Hazelnut Florentines

    It's been about a week since i've posted anything here. It's not that I haven't been baking- I made lemon bars, brownies, coconut chocolate chip cookies, mocha slices, and one or two other things. Unfortunately, most of these recipes turned out to be duds.

    The brownie tart from Maxine Clark's Tarts: Sweet and Savory was too sweet and weakly flavored. 4 ounces of 72% chocolate was not enough to cut the 2 cups of sugar and 14 tbsp of butter. The brownies did have an interesting texture though.

    The tangy lemon squares from The Weekend Baker tasted good, but they were extremely difficult to serve neatly. The smooth lemon curd topping tasted great, but it was messy and the shortbread crust got a little soggy. Since they were hard to handle, I ate them with a fork. I might try the recipe again with some modifications.

    The chocolate chip coconut cookies from Pichet Ong's The Sweet Spot didn't spread much in the oven and had a weird texture. I probably over-measured the flour, but i'm wondering if other bakers have had problems following the weight measurements in this book. It's not the first time i've had weird results.

    I think the bad baking and photography mojo is some combination of stress, personal error, and recipe troubles. After all of these frustrating attempts, I decided to make a recipe that always turns out well.

    I've posted these florentines on the blog before, but I didn't include the recipe. They are thin, crunchy and elegant. They do spread a lot in the oven, so I suggest erring on the smaller side of 1 tsp while measuring the batter. Keep an eye on the baking time too, as these cookies quickly go from perfect to burnt.

    Cocoa Nib Florentines
    adapted from Emily Luchetti's A Passion for Ice Cream

    2 oz (4 tbsp) unsalted butter
    1/4 cup heavy (whipping) cream
    6 tbsp sugar
    2 tbsp + 3/4 tsp all purpose flour
    1/3 cup (1.5 oz) pistachios (or other nuts), toasted, skinned, and chopped
    1/2 cup cocoa nibs

    Preheat the oven to 350F. Line 3 baking sheets with parchment paper. Melt the butter in a saucepan over medium heat. Add the cream, sugar, flour, the 1/3 cup nuts, and the cocoa nibs. Cook the mixture over medium-low heat, stirring constantly, until it thickens and comes clean from the bottom of the pan as you stir, about 3 minutes. Remove the pan from the heat.

    Drop teaspoonsuls of the batter 3.5 inches apart on the prepared pans. The cookies will spread as they bake. Bake until golden brown, about 10 minutes. Let the cookies cool to room temperature on the pans and then remove them with a metal spatula.

    Saturday, May 5, 2007

    Kumquat Poundcakes, Revel Bars and More!

    Kumquat Poundcake
    Kumquat Poundcake from Hidemi Sugino's Dessert Book.

    Revel Bars
    Oatmeal cookie type bar with thick chocolate ganache in the middle.

    tartufi

    tartufi1
    Chocolate covered Ice Cream! Lemon/soft gingersnap, green tea, panforte, and turron.

    compote

    compote1
    Kumquat Compote in process.

    Apple Pudding Cake
    Apple and almond pudding from Bill's Open Kitchen.

    Crepes
    Orange and Buckwheat Crepes filled with nutella and oranges.

    Pierre Herme's Lemon Tart
    Pierre Herme's Lemon Tart.