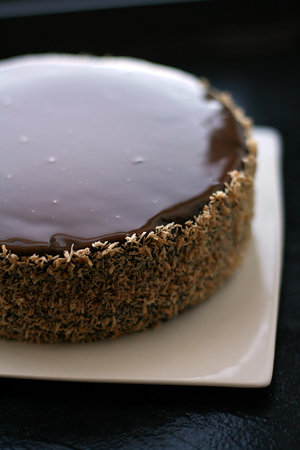
This cake was meant to be a swan song of sorts. Between a full schedule of work and summer classes, there's no time for complex baking projects. I'll be moving soon, so I used up most of my baking ingredients on a multi-component cake. Now I can slowly start packing up the kitchen.
I picked this recipe from Payard's Chocolate Epiphany because the chocolate cake looked extremely simple. It's made with simple ingredients and simple techniques. I'd use it for other layer cakes because it's moist and it has good structure.
I didn't think the directions for this cake were particularly well explained; I wasn't sure what the cooked egg mixture for the mousse was supposed to look like, and I had a lot of trouble with temperatures. The recipe says the caramel glaze should be applied close to body temperature, but even at 80 degrees it was very runny.
I know that restaurants often use cream with a higher fat content. This might have been the problem, but it could have been a problem with my kitchen scale. If you have more success with the glaze, let me know. Mine tasted great, but it was more like a caramel sauce.
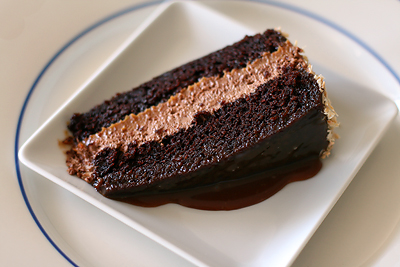
The best part was the filling. I loved the combination of rich chocolate mousse and dense, dark caramel. The toasted coconut garnish was also a nice touch.
Chocolate Coconut Caramel Cake
adapted from Payard's Chocolate Epiphany
Caramel Filling
1/4 cup (70g) light corn syrup
2/3 cup (125g) sugar
1/2 cup + 2 tbsp (150g) heavy cream, at room temperature (*you can warm it briefly on the stove or in the microwave)
3 tbsp (50g) unsalted butter, at room temperatre, cut into small pieces
Cake
Vegetable cooking spray, for the pan
2 1/3 cups (235g) all-purpose flour
2 tsp (10g) baking soda
1 2/3 cup (335g) sugar
2 tsp (7g) salt
1 cup (225g) buttermilk
3/4 cup (170g) vegetable oil
2 large eggs
1/2 cup (45g) dutch processed cocoa powder
Chocolate Mousse
1/2 cup (125g) heavy cream
3 oz (82g) 72% chocolate, chopped
1/4 cup (62g) whole milk
1/3 cup (62g) sugar
2 large egg yolks
Caramel Glaze
1 cup (200g) sugar
1 1/3 cups (330g) heavy cream, at room temperature
4 oz (120g) milk chocolate, chopped
2 tbsp (30g) unsalted butter
1/2 cup (135g) light corn syrup
Garnish
2 cups (150g) unsweetened shredded coconut, lightly toasted
Make the caramel filling: Place the corn syrup in a medium saucepan over medium high heat. Pour the sugar over the corn syrup and let the sugar begin to melt. When the mixture begins to turn slightly golden, stir it gently with a wooden spoon to make sure that the sugar dissolves and the caramelization is even. If sugar sticks to the sides of the pan, dip a pastry brush in water and brush the sides. Once the sugar reaches a dark amber color, after 5-10 minutes, add the cream and keep stirring over the heat, to ensure the sugar is completely melted. The sugar mixture will splatter, so be sure to not stand directly in front of the pan when you do this.
Transfer the caramel to a bowl and let it cool to room temperature, then stir in the butter until it is fully incorporated. Place the caramel in the refrigerator for about 1 hour, until it is thick but still spreadable. You can also make this a day ahead. In this case, soften the caramel in the microwave before using in 10 second increments, until it reaches a spreadable consistency.
Make the cake: Place a rack in the center of the oven and preheat to 350F. Spray a 9inch round cake pan with cooking spray. Cut a 9inch round of parchment paper, place it at the bottom of the pan, and spray it as well. (Use a 9x3 or taller cake pan- 2 inches will be too short).
Sift together the flour, baking soda, sugar, and salt over a large bowl. In a separate bowl, whisk together the buttermilk, oil, and eggs, and add them to the dry ingredients. Whisk until the ingredients are just combined.
Place 1/2 cup (125g) water in a small saucepan over medium high heat, and bring to a boil. Whisk in the cocoa powder, and let the mixture return to a boil, constantly whisking. Pour it over the batter, and stir it in with a spatula or wooden spoon. Pour the batter into the prepared pan, and bake for about 30 minutes, until a wooden skewer inserted in the center of the cake comes out clean and the sides slightly pull back from the edges of the pan. Let cool in the pan. (My baking time was 40-45 minutes).
Make the chocolate mousse: Pour the cream in a large bowl and whisk until it holds soft peaks. Set aside. Place the chocolate in the bowl of an electric mixer fitted with the whisk attachment.
Bring the milk to a boil in a medium saucepan. Meanwhile, in a medium bowl, whisk the sugar with the yolks until the mixture turns a pale yellow. Pour a third of the milk into the yolk mixture and whisk until the mixture is well combined. Lower the heat to low. Pour the mixture back into the saucepan, and return to the heat. Stirring constantly with a wooden spoon, cook the mixture until it thickens and coats the back of the spoon, about 3 minutes.
Pour the mixture over the chocolate, and whip on medium high speed until the mixture is cool, becomes very fluffy, and nearly doubles in volume, 10-15 minutes. With a spatula, gently fold the whipped cream into the chocolate mixture, and refrigerate until ready to use, at least 15 minutes and up to 2 days.
Make the caramel glaze: Place the sugar in a medium saucepan over medium high heat. When the sugar begins to turn slightly golden, gently stir it with a wooden spoon to make sure that the sugar dissolves and the caramelization is even. If sugar sticks to the side of the pan, dip a pastry brush in water and brush the sides. When the caramel turns a light caramel color, add the cream and keep stirring over the heat, to ensure that the sugar is completely melted. The mixture will splatter, so do not stand directly in front of the pan. Remove from the heat, and stir in the chocolate, butter, and corn syrup. The glaze should be warm, close to body temperature, when you pour it over the cake. If it cools down too much, transfer it to a microwave safe bowl and reheat it in the microwave in 10 second increments until it's pourable.
Assemble the cake: Line a baking sheet with wax paper, and place a wire cooling rack on top of the paper. Unmold the cake. If necessary, trip the top of the cake w/ a serrated knife to make it flat. Cut it horizontally into two even layers. Place the top layer of the cake in front of you on a 9 inch cardboard cake round. Spread all of the caramel filling over the cake, then spread the chocolate mousse over the caramel. Place the bottom layer of the cake, bottom side up, over the mousse. This will ensure that the surface of the cake is smooth, which will make its coating easier.
Without removing the cake board, transfer the cake to the cooling rack and pour the caramel glaze over the cake. Use an offset spatula that is larger than the diameter of the cake to help the glaze flow down over the sides. The whole cake should be coated. Without removing it from the rack, refrigerate it for 30-60 minutes, until the glaze has set up. It will feel sticky, but will be thicker and firmer.
Place the coconut on a piece of wax paper. With a large serving spatula, carefully remove the cake, still on the board, from the rack and place it in the center of your left hand (or right if you are left handed) over the paper. With the over hand, scoop up the coconut and press it on the sides of the cake. When the cake is coated all the way around, place it on a serving platter. Refrigerate the cake until you are ready to serve it, up to 1 day. Remove the cake from the fridge 30 minutes before serving.

16 comments:
You allways make amazing things, but I'll have to say that from all the goodies I've found here this one was probably my favourite so far. I love how it look, the dark color of the cake, the flavours, the photo of the slice... Yummy!
Wow, your cake looks like it could've been the picture for the book! (Which happens to be sitting right next to me at the moment...) Yea, I basically want to make everything out of that book.
well, you might have troubles but the photos look like that cake is perfection! And that slice is cut so cleanly... It really bothers me when people take photographs of cake slices that are "butchered"... this is really lovely Lisa.
Good luck moving!
Oh holy smokes!! That looks intense!!
Even though it is 5:30am (bit of the insomniac) I really want to go and make this right now!!!
i love your blog. you're a genius baker. everythng is just gorgeous. and this tops it for me. mmmm.
chocolate, coconut, and caramel happen to be my favorite dessert components, so i'm absolutely smitten with this cake. it's gorgeous--nicely done!
*swoon*
Beautiful!!!
That looks so dense and gorgeous... I love the glaze seeping out from underneath the cake (slightly reminds me of a pool of blood for some reason; apparently I like to make macabre comparisons to people's food). Sorry for ruining that for you now, haha. But I'd still eat it XD.
Sorry to hear you won't be blogging this summer. Good luck!
gorgeous cake. looks delicious and amazingly decadent. good luck with your endeavors!
jennifer
www.oyecookie.com
wow. that looks amazing.
I can't believe I almost lost this post, Lisa - what a stunning looking cake! I love the dark color of the glaze and think that you did an amazing job, even though the instructions weren't clear enough.
That is stunning. I can't wait to try it!
That looks incredible! What I don't like when cakes have a mousse filling is when the cake itself is dry, but yours doesn't have that problem. The caramel+chocolate+coconut combination is one of my favorites!
That is gorgeous!!!
Post a Comment