It takes a certain level of commitment to make a layer cake. You need time, space, equipment, and ridiculous amounts of butter. You also need patience and a steady hand, if you want a smooth finish and even piping. Most importantly, you need practice.
It is expensive to practice making layer cakes, so I don't make them very often. Still, I like to have a few in my repertoire for birthdays and celebratory occasions. A homemade cake can be much cheaper (and in my opinion, better) than a store-bought cake, and making one can be a fun way to spend an afternoon.
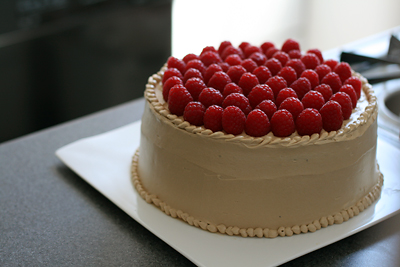
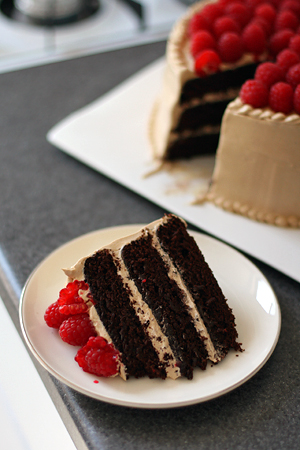
If you're worried about how the cake will look, you can always make a batch of frosting (or mashed potatoes) and practice piping on a cake pan. For this cake, you'll need about 5 cups of frosting. I used an easy recipe for espresso frosting- if you prefer vanilla, you can omit the espresso powder. You can also substitute your favorite buttercream.
The layer cake recipes in The America's Test Kitchen Family Baking Book are very forgiving, and I recommend them if you like step-by-step photographs and tips. I've also had success with cakes from Tish Boyle's The Cake Book and Flo Braker's The Simple Art of Perfect Baking.
Devil's Food Cake with Espresso Frosting
adapted from The America's Test Kitchen Family Baking Book
For the cake:
1/2 cup dutch-processed cocoa powder
1 1/2 cups all-purpose flour
1 tsp baking soda
1/2 tsp baking powder
1/4 tsp salt
1 1/4 cups boiling water
4oz unsweetened chocolate, chopped
1 tsp instant espresso powder
10 tbsp unsalted butter, softened
1 1/2 cups packed light brown sugar
3 large eggs, at room temperature
1/2 cup sour cream, at room temperature
1 tsp vanilla extract
1. Adjust the oven racks to the upper-middle and lower-middle positions and preheat to 350F. Grease 3 8-inch round cake pans, then dust with cocoa powder and line the bottoms with parchment paper. Whisk the flour, baking soda, baking powder, and salt together in a large bowl. In a medium bowl, whisk the boiling water, chocolate, 1/2 cup cocoa, and instant espresso together until smooth.
2. In a large bowl, beat the butter and sugar with an electric mixer on medium speed until light and fluffy, 3-6 minutes. Beat in the eggs, one at a time, until combined, about 30 seconds. Add the sour cream and vanilla and beat until incorporated.
3. With the mixer on low, beat in 1/3 of the dry ingredients followed by 1/2 of the chocolate mixture. Repeat with half of the remaining flour and the remaining chocolate. Beat in the remaining flour until just incorporated.
4. Give the batter a final stir with a rubber spatula to make sure it is thoroughly combined. Scrape the batter into the prepared pans, smooth the tops, and gently tap the pans on the counter to settle the batter. Bake until a toothpick inserted in the center comes out with a few crumbs attached, 15-20 minutes, rotating the pans halfway through baking.
5. Let the cakes cool in the pans for 10 minutes. Run a knife around the edge of the cakes, then flip them out onto wire racks. Peel off the parchment and flip cakes right side up. Let cool completely before frosting, about 2 hours.
For the frosting:
4 sticks unsalted butter, cut into chunks and softened
1/4 cup heavy cream
1 tbsp vanilla extract
1/4 tsp table salt
3 tsbp instant espresso powder
4 cups confectioners' sugar
1. Beat the butter, cream, vanilla, salt, and espresso powder together in a large bowl with an electric mixer on medium-high speed until smooth, 1-2 minutes.
2. Reduce the speed to medium-low, slowly add the confectioners' sugar, and beat until smooth, 4-6 minutes. Increase the mixer speed to medium high and beat until the frosting is light and fluffy, 5-10 minutes.

10 comments:
awwww...just the thing i needed, a dessert with lots and lots of butter and chocolate!
I have decorating issues so I need the practice. Your layers are really clean and precise. I love it!
This is just a gorgeous cake, especially the contrast between the red and brown.
Probs what I need to work on is my piping skillz, but that can easily be accomplished on cupcakes or just a sheet of wax paper. Although going ahead and making a layer cake is bound to make someone happy. =)
a beautiful cake! much better than store-bought, that's for sure!
Oh Lisa! This is the perfect cake! It looks beautiful and delicious.
-Lauren H
looks amazing!
I don't think I ever made a real layer cake....huh...
I can never eyeball how much frosting to put in between the layers so that everything looks even after frosting the top and sides. Do you have a guesstimate as to how much frosting you put on the first and second layers?
Hi Lobelia-
I budget 3/4 cup to 1 cup per layer. With this recipe, I had about 1 to 1.5 cups of frosting leftover.
This is gorgeous! Wow! You should run a "How to frost a cake" workshop for all of us frosting-impaired bakers.
I just came across your blog while researching which chocolate cake to make, as I have gone through many recipes (most recently some from Rose L Beranbaum) looking for the ultimate. I am going to try the Devil's food cake you posted about from America's test kitchen as your photo looks divine, and also tossing up between Tish Boyle's Choc Sour Cream Layer cake, which you also posted about. I would like a moist cake which isn't very crumbly. I was curious which one out of these two did you prefer?
Lori
Post a Comment