Friday, January 30, 2009

Croissants from Jean-Marc Chatellier

Croissants from Jean Marc Chatellier

Croissants from Jean Marc Chatellier

Last week I stopped by Jean Marc Chatellier to buy pastries for work. I decided on assorted croissants: 2 plain, 2 almond, and 3 chocolate. I was sorely tempted by a tray of freshly made lemon tarts, but I thought they'd be a little much for breakfast.

If you can get to Millvale, the bakery is worth a visit. Not all of the pastries are my favorite, but they are executed with elegance and attention to detail. There's always something interesting to see; on previous visits I've seen Jean-Marc working on exquisite wedding cakes with elaborate florals.

These croissants were quite large. The almond croissant was filled with a pastry cream which was delicious, but not the almond cream I was expecting. Still, $9 dollars for 7 pastries is a bargain, and there are enough varieties for everyone to find something they like.

Monday, January 26, 2009

Reuben's Legendary Apple Pancake

Apple Pancake

Apple Pancake w/ Vanilla Ice Cream

The first time I made this pancake, I tried to flip in in the pan. I gave the skillet a forceful jerk and the 8-inch pancake, beautifully caramelized, ended up on the floor in pieces- a sticky mess of apples, and raisins, and undercooked batter. It was tragic, really.

The idea of a sugar encrusted apple pancake sounded irresistible, so I was determined to try again. My second attempt was much more successful. While Richard Sax's recipe is fairly simple in terms of ingredients and technique, the execution can be troublesome. I had a few notes on the process:

It's hard getting the batter to cook evenly before the first flip, and it's easy to burn the sugar if the heat is too high. I'd recommend letting the batter sit a while on low heat before trying to pull back the edges and let the uncooked batter flow underneath. I'd also suggest greasing the plate you turn the pancake onto, as the caramel gets very sticky.

The finished product was inexpensive and, in my opinion, worth the trouble. I like the simple, clean flavors. It's best eaten shortly after it's made, but the cold leftovers are still pretty tasty.

You can find the recipe here.

Saturday, January 24, 2009

Buckwheat Crepes with Apples and Gruyere

Buckwheat Crepes with Apples and Gruyere

Buckwheat Crepes with Apples and Gruyere

I found this recipe in the dessert section of 
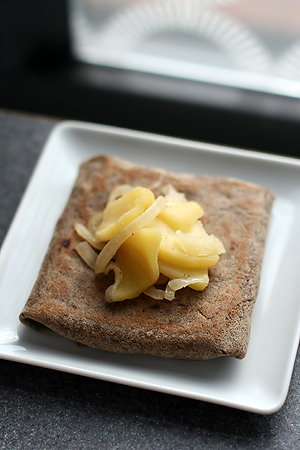
Leite's Culinaria. I think it's better suited to breakfast or brunch, but that's negotiable. I love apples in savory contexts like slaws, vegetable mashes, and chutneys. Here, they're combined with Spanish onions, smoked ham, and Gruyere cheese, with a touch of nutmeg and lemon.

Both the crepes and filling can be made ahead of time and refrigerated until needed. It's a great recipe if you're cooking for one or two, or if you want a fancy snack on hand. I loved that the simple components turned into something so sophisticated and subtle.

The filling is quick to assemble and can be made in smaller quantities if needed. It's also quite adaptable: you can use bacon instead of ham, or omit the meat for a less savory variation. I'd love to try adding some thyme or another fresh herb.

I have a few notes: Initially, my batter was too thick and yielded dense, rubbery crepes. I had to add about 1/2 cup more water to get the right consistency. I worried the crepes would be too thick or too plain, but they were well suited to the filling.

Be sure to cook the filling in a large skillet- an 11-inch fry pan comfortably held the half batch in a single layer. A full batch probably won't fit in anything smaller. Also, when filling the crepes, make sure to fold the crepe up before it becomes too brittle. The longer it cooks, the less flexible it will be.

I didn't bother buttering the skillet before cooking each crepe, or brushing the finished crepes with melted butter. They seemed fine as-is, and I enjoyed them thoroughly.

Buckwheat Crepes with Apples and Gruyere
adapted from Marie Simmons's Things Cooks Love

Crepe batter:
1 cup buckwheat flour
1/2 cup all-purpose flour
1 teaspoon coarse salt
2 large eggs
1 1/2 cups water
2 tablespoons salted or unsalted butter, melted

Filling:
4 tablespoons salted or unsalted butter
3 yellow onions, cut into 1/8-inch wedges
6 slightly green Golden Delicious apples, quartered, cored, and cut crosswise into 1/8-inch
wedges
2 ounces smoked ham, thinly slivered (optional)
3 tablespoons freshly squeezed lemon juice
1/8 teaspoon freshly grated nutmeg
Pinch of coarse salt

1 tablespoon salted or unsalted butter, melted, plus 2 tablespoons, softened
3 cups (12 ounces) coarsely grated Gruyère or Comté cheese

Directions:
Make the crepe batter
1. In a large bowl, stir together the buckwheat flour, all-purpose flour, and salt. In a
small bowl, whisk the eggs until well blended; stir in the water and butter.

2. Gradually whisk the egg mixture into the flour mixture until the batter is smooth.
Cover and refrigerate for 1 hour. The batter should be the consistency of heavy
cream. If it is too thick, whisk in additional water, 1 tablespoon at a time.

Make the filling
1. While the batter is resting, make the filling. In a large skillet, melt the butter
over medium-low heat. Add the onions; increase the heat to medium, and cook,
stirring, for 5 minutes. Add the apples and cook, stirring, for 10 to 15 minutes, until
the apples begin to brown and have softened. Add the ham and sprinkle with the
lemon juice, nutmeg, and salt. Cover and set aside until ready to fill the crepes.

Make and assemble the crepes
1. Heat a 9- to 11-inch crepe pan over medium-low heat until hot enough for a drop
of water to sizzle on contact. Brush the surface of the crepe pan with a thin film of
the melted butter. Blot any excess with the tip of a paper towel. Stir the crepe batter
well with the whisk.

2. Ladle about 1/3 cup of the batter into the heated pan, and simultaneously tilt and
roll the pan from side to side to coat the surface with a thin layer of batter. Cook for
1 minute, or until the edges begin to set. Run the tip of a small narrow rubber
spatula under the edges of the crepe to loosen it from the pan. Use your fingertips to
lift the crepe and quickly flip it over. Cook the other side for 30 seconds, or until the
batter is set into a thin pancake. Do not brown the crepe or cook it until crisp.
Transfer the crepe to a large, round plate. Repeat with the remaining batter,
brushing the pan with more butter if necessary. Stack the crepes as they are made.
You should have 12 crepes. If making ahead, wrap the crepes in plastic wrap or
aluminum foil to prevent drying out. The crepes can be refrigerated for up to 2 days.

3. If the crepes have been made ahead, first fill them one at a time by warming each
crepe in the pan over low heat. Otherwise, when the fresh crepe is cooked and still in
the pan, sprinkle about 1/4 cup of the cheese in the center. Top the cheese with a
large spoonful of the warm apple filling, spreading it into a single layer. Fold in two
opposite sides of the circle to cover the filling. Then fold in the remaining two
rounded sides, overlapping slightly, to form a square envelope. With a wide spatula,
lift the crepe from the pan and invert it, so it is seam side down, onto a serving
plate. Cover with aluminum foil to keep warm if not serving at once. Fill the
remaining crepes in the same way. Reserve the remaining filling.

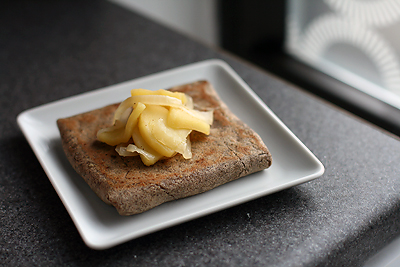
4. Just before serving, brush the smooth top of each crepe with a thin film of the
softened butter. Reheat the remaining apple filling and spoon a portion on top of
each crepe. Serve at once.

Wednesday, January 21, 2009

Salty Thin and Crispy Oatmeal Cookies

Thin and Crispy Oatmeal Cookies

Thin and Crispy Oatmeal Cookies

Several people have asked for this recipe since I posted the photos in November, so I figured it was time to post it. It yields a thin, very crisp cookie that's good for snacking. Since the dough is heavy on sugar, it's important to wait until the cookies are fully cooled before eating them (unless you're a fan of that tough, stick-to-your teeth texture).

While the sea salt topping is optional, I think it's a great contrast to the sweet cookies. My cookies spread to 3.5-4 inches in diameter (too large for my tastes), so next time i'd divide the dough into smaller portions. I think smaller, uniformly shaped cookies would bake more evenly.

Do avoid overbaking the cookies- they quickly change from perfect to burnt. Golden brown and dark brown cookies have a marked difference in taste. I forgot a batch in the oven and when I finally pulled them out they were carbon...happens to the best of us!

Salty Thin and Crispy Oatmeal Cookies
adapted from Cook's Illustrated
1 cup all-purpose flour
3/4 teaspoon baking powder
1/2 teaspoon baking soda
1/4 teaspoon table salt
14 tablespoons unsalted butter, softened but still cool, about 65 degrees
1 cup granulated sugar
1/4 cup packed light brown sugar
1 large egg
1 teaspoon vanilla extract
2 1/2 cups old-fashioned rolled oats
1/2 teaspoon coarse sea salt

Instructions
1. Adjust oven rack to middle position and preheat to 350 degrees. Line 3 large baking sheets with parchment paper. Whisk flour, baking powder, baking soda, and salt in medium bowl.

2. In standing mixer fitted with paddle attachment, beat butter and sugars at medium-low speed until just combined. Increase speed to medium and continue to beat until light and fluffy, about 1 minute. Scrape down bowl with rubber spatula. Add egg and vanilla and beat on medium-low until fully incorporated, about 30 seconds. Scrape down bowl again. With mixer running at low speed, add flour mixture and mix until just incorporated and smooth, 10 seconds. With mixer still running on low, gradually add oats and mix until well incorporated, 20 seconds. Give dough final stir with rubber spatula to ensure that no flour pockets remain and ingredients are evenly distributed.

3. Divide dough into 24 equal portions, each about 2 tablespoons, then roll between palms into balls. Place cookies on prepared baking sheets, spacing them about 2 1/2 inches apart, 8 dough balls per sheet. Using fingertips, gently press each dough ball to 3/4-inch thickness. Lightly sprinkle sea salt evenly over flattened dough balls before baking.

4. Bake 1 sheet at a time until cookies are deep golden brown, 13 to 16 minutes. Transfer baking sheet to wire rack; cool cookies completely on sheet.

Sunday, January 18, 2009

Strip District Sweets

Chocolate Pecan Praline Popcorn

Chocolate Pecan Praline Popcorn

Chocolate Croissant

Yesterday morning, if you had asked me if I liked caramel corn, I would have said no. I knew two kinds of caramel corn: Cracker Jack, and the kind that comes in a multi-compartmented Christmas tin-the stale, achingly-sweet caramel corn that always ends up contaminated with radioactive orange cheese corn. (Apparently some people like the half-cheese half-caramel option!)

And yet I felt a sudden urge to stop in the Pittsburgh Popcorn Company while I was in the Strip. It took over the space next to Colangelo's (formerly Il Piccolo Forno) that used to sell fancy stationery and ceramics. The owners met working at a popcorn shop in NYC. The interior is cheery and somewhat whimsical. You can watch someone drizzling chocolate over freshly made caramel corn while someone else, perched on a ladder, carefully monitors a giant kettle of popping corn.

I bought a bag of Chocolate Pecan Praline popcorn. This is the sort of sweet i'd rather buy than make myself; caramel corn recipes can be difficult (David Lebovitz has posts on multiple attempts, and Adam Roberts failed 8 times before succeeding), and it is dangerous to have lying around in big quantities. Amanda from Slow Like Honey said it looked like crack in a bag.

I don't see myself buying fancy popcorn regularly, but I did enjoy it (though I wished it had a few pinches of sea-salt thrown in). Good quality chocolate and toasted nuts make such a difference in taste. I also appreciated that the store had Steelers tins and a special "Black and Gold" flavor...I love Pittsburgh for things like that.

After my popcorn adventure I stopped by Enrico Biscotti for a chocolate croissant. Their croissants are some of my favorite in the city, though the plain ones have varied in consistency over the years. They have a nice yeasty flavor and flaky, yielding texture. I like to heat them up in the oven.

Saturday coffee and pastry is one of my favorite habits. I'm usually in the mood for pastries i'd never bake at home, and chocolate croissants definitely fit in that category.

Tuesday, January 6, 2009

Tuscan Bean Stew with Sausage and Kale

Tuscan Bean Stew with Sausage and Kale

I did some baking during the holidays, but not much. Some of my favorite items were Pains D'Amande and Bill Granger's Pear Cake with Vanilla Custard (made with apples instead).

Now that the holiday season is over and the weather is less than optimal, i'm in the mood for soup. I've started to cooking huge pots of soup on Sundays. I'll divvy the soup into tupperwares for work and freeze the extra for weeks when i'm too tired to cook (which are often at the moment).

I used this recipe as an opportunity to (finally) buy some sausage from the Parma Sausage Company. It had great flavor, though it made the soup a little rich and I might use less next time. You can buy loose sausage in relatively inexpensive 1.5lb packages. I've made the vegetarian version of this soup as well, which is flavored with extra herbs and porcini mushrooms instead of meat.

I should start baking more once I settle back into work. I've been reading lots of recipes for slice and bake cookies, and i'm looking for an excuse to use the 40% butterfat, not "ultra-pasteurized" Turner's cream from Whole Foods. Too bad I sold the ice cream maker...

Tuscan Bean Stew with Sausage and Cabbage
adapted from Cook's Illustrated

Table salt
1 pound dried cannellini beans (about 2 cups)
1 tablespoon extra virgin olive oil
1 1/2 pounds sweet Italian sausage, casings removed
1 large onion, chopped medium (about 1 1/2 cups)
2 medium celery ribs, cut into 1/2-inch pieces (about 3/4 cup)
2 medium carrots, peeled and cut into 1/2-inch pieces (about 1 cup)
8 medium garlic cloves, peeled and crushed
4 cups low-sodium chicken broth
3 cups water
2 bay leaves
1/2 medium head savoy cabbage, cut into 1-inch pieces (I used kale)
1 (14.5-ounce) can diced tomatoes drained and rinsed
1 sprig fresh oregano leaves
Ground black pepper

Instructions
1. Dissolve 3 tablespoons salt in 4 quarts cold water in large bowl or container. Add beans and soak at room temperature for at least 8 hours and up to 24 hours. Drain and rinse well.

2. Adjust oven rack to lower-middle position and heat oven to 250 degrees. Heat oil and sausage in large Dutch oven over medium heat. Cook, breaking meat into small pieces with wooden spoon until it loses its raw color, about 8 minutes. Transfer sausage to paper towel-lined plate and place in refrigerator. Add onion, celery, and carrots. Cook, stirring occasionally, until vegetables are softened and lightly browned, 10 to 16 minutes. Stir in garlic and cook until fragrant, about 1 minute. Stir in broth, water, bay leaves, and soaked beans. Increase heat to high and bring to simmer. Cover pot, transfer to oven, and cook until beans are almost tender (very center of beans will still be firm), 45 minutes to 1 hour.

3. Remove pot from oven and stir in greens, sausage, and tomatoes. Return pot to oven and continue to cook until beans and greens are fully tender, 30 to 40 minutes longer.

4. Remove pot from oven and submerge oregano sprig in stew. Cover and let stand 15 minutes. Discard bay leaves and oregano sprig and season stew with salt and pepper to taste. If desired, use back of spoon to press some beans against side of pot to thicken stew.